Chocolate Dipped Fruit Cones-Easy Dessert
Chocolate Dipped Fruit Filled Cones are more than just a treat; they’re an edible symphony of textures and flavors that capture pure joy in every bite. Imagin extracte this: a perfectly crisp waffle cone, its subtle sweetness a prelude to the delightful surprise within. We then lovingly fill these cones with a medley of fresh, vibrant fruits – think juicy berries bursting with tartness, or sweet, tender slices of ripe mango. But the magic truly happens when we dip the entire creation in rich, velvety chocolate. The satisfying snap as you bite through the chocolate shell, followed by the cool, refreshing burst of fruit, and then the satisfying crunch of the cone, is an experience that appeals to everyone. It’s this delightful interplay of sensations, coupled with the inherent sweetness and natural goodness of the fruit, that makes Chocolate Dipped Fruit Filled Cones such an irresistible indulgence. They’re perfect for celebrations, a delightful afternoon pick-me-up, or simply when you crave something truly special.

Chocolate Dipped Fruit Filled Cones
There’s something undeniably magical about a chocolate-dipped creation, isn’t there? Especially when that creation is a delightful blend of sweet, crunchy, and fruity goodness. Today, we’re diving into making Chocolate Dipped Fruit Filled Cones, a treat that’s as fun to assemble as it is to devour. Imagin extracte crisp waffle cones, generously filled with creamy goodness and then dipped in rich, smooth chocolate. It’s a perfect dessert for any occasion, from a casual afternoon indulgence to a show-stopping addition to a party spread. These aren’t just ice cream cones; they’re a whole experience! The beauty of this recipe is its versatility. You can customize the fruit filling to your heart’s content, and the chocolate coating offers endless possibilities for toppings. Get ready to impress yourself and everyone around you with these elegant yet simple-to-make treats.
Ingredients:
Preparing the Creamy Fruit Filling
The foundation of our delightful cones is a luscious and creamy filling. This isn’t just about sweetness; it’s about creating a delightful texture that complements the crunch of the cone and the snap of the chocolate. We’ll start by whipping together some softened cream cheese. Make sure your cream cheese is truly softened to room temperature. This is crucial for achieving a smooth, lump-free filling. If it’s still a bit firm, you can gently warm it in the microwave for 10-15 second intervals, but be careful not to melt it completely. Next, we’ll introduce the powdered sugar. Sifting the powdered sugar before adding it can help prevent any grainy texture in the final filling. Beat the cream cheese and powdered sugar together until they are light and fluffy. This creates a beautiful, airy base.
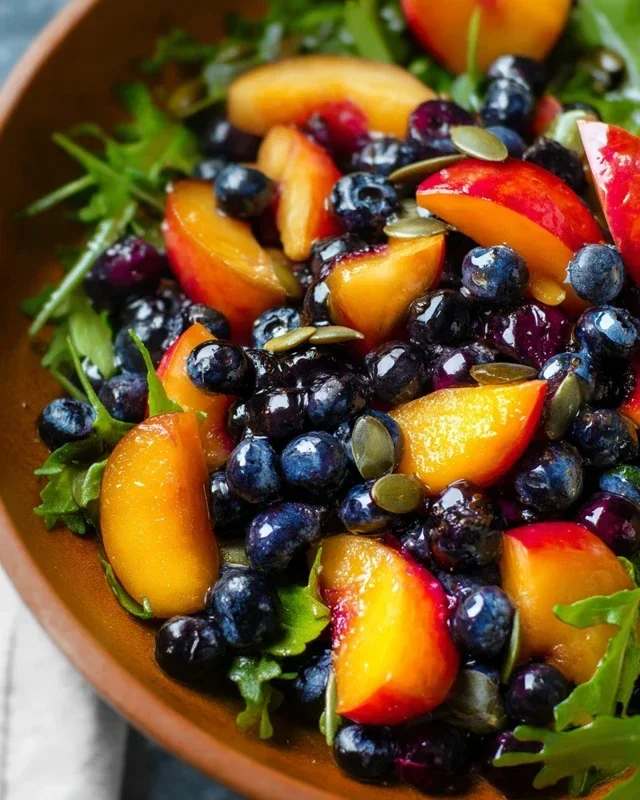
Now, it’s time to add the liquid elements. Pour in the heavy cream and the vanilla extract. The heavy cream will add a lovely richness and lightness to the mixture, while the vanilla extract provides that classic, comforting flavor. Whip this mixture again until it’s smooth and all the ingredients are well incorporated. You should have a luscious, spreadable consistency. Finally, we’ll fold in our finely chopped fresh berries. Using finely chopped berries ensures they distribute evenly throughout the filling and don’t make the mixture too watery. The natural sweetness and slight tartness of the berries will cut through the richness of the cream cheese filling beautifully. Gently fold them in with a spatula to avoid overmixing, which can bruise the berries and release too much juice.
Assembling the Fruit Filled Cones
With our creamy fruit filling ready, it’s time to start filling the cones. You’ll want to work relatively quickly, especially if your kitchen is warm, to keep the filling from becoming too soft. You can use a spoon or a piping bag fitted with a large round tip to fill the waffle cones. If using a spoon, simply scoop generous dollops of the filling into each cone, pressing down gently to fill them completely. If you’re using a piping bag, fill the cones from the bottom up, ensuring there are no air pockets. You can create a slightly domed top of the filling for an appealing presentation before dipping. Aim to fill the cones almost to the very top, leaving just a tiny bit of space for the chocolate coating.
The Chocolate Dipping Magic
This is where the magic truly happens! We’ll be melting our chocolate chips for the coating. In a microwave-safe bowl, combine your chocolate chips with the optional coconut oil. Coconut oil helps to thin out the chocolate, making it silkier and easier to dip, and it also helps it set with a lovely sheen. Microwave the chocolate in 30-second intervals, stirring well after each interval. It’s important to stir thoroughly to ensure even melting and prevent scorching. Continue this process until the chocolate is almost completely melted, then stir until it’s completely smooth. You can also melt the chocolate using a double boiler method over simmering water. Once the chocolate is smooth and luscious, it’s ready for dipping.
Holding a filled cone carefully, dip it into the melted chocolate, tilting the bowl to coat the top and sides of the filling and the upper part of the cone. You want a good, even coating. Allow any excess chocolate to drip back into the bowl for a few seconds. This ensures a clean finish and prevents overly thick, heavy chocolate. For best results, hold the cone vertically over the bowl for a moment or two to let the excess chocolate run off.
Finishing Touches and Setting
After dipping your cones in chocolate, gently place them on a parchment-lined baking sheet or a wire rack. The parchment paper will prevent the chocolate from sticking to your work surface. This is also the perfect time to add any desired toppings! If you’re using sprinkles, chopped nuts, or shredded coconut, sprinkle them over the wet chocolate immediately after dipping. The toppings will adhere best while the chocolate is still molten. You can also drizzle extra melted chocolate over the dipped cones for an added decorative touch, or press extra chopped fruit onto the wet chocolate. Once all your cones are dipped and decorated, it’s time for them to set. Place the baking sheet or wire rack in the refrigerator for about 15-20 minutes, or until the chocolate has hardened completely. This chilling process helps the chocolate set firm and gives the cones a beautiful, glossy finish. Once set, they are ready to be enjoyed! Store any leftovers in an airtight container in the refrigerator.

Conclusion:
I hope you’ve enjoyed learning how to create these delightful Chocolate Dipped Fruit Filled Cones! They truly are a showstopper, offering a wonderful combination of crispy waffle cones, luscious fruit fillings, and rich chocolate. This recipe is fantastic because it’s surprisingly easy to make but delivers a gourmet feel, making it perfect for special occasions or just a fun weekend treat. The burst of fresh fruit contrasted with the decadent chocolate coating is simply irresistible.
For serving, imagin extracte these as the ultimate dessert centerpiece at parties, a charming addition to a brunch spread, or even a unique hostess gift. They pair beautifully with a scoop of vanilla ice cream or a dusting of powdered sugar. Don’t be afraid to experiment with different fruit fillings – berries, peaches, or even a creamy banana pudding would be divine! You can also get creative with your chocolate; try dark, milk, or white chocolate, or even swirl two together. So please, give these Chocolate Dipped Fruit Filled Cones a try. I’m confident you’ll love them as much as I do!
Frequently Asked Questions:
How do I store leftover cones?
For the best texture, store any leftover Chocolate Dipped Fruit Filled Cones in an airtight container in the refrigerator. Place a layer of parchment paper between the cones to prevent sticking. They are best enjoyed within 2-3 days for optimal crispness of the cone and freshness of the filling.
Can I make these ahead of time?
Yes, you can definitely make these ahead! It’s best to prepare the fruit filling and chop your fruit a day in advance and refrigerate it. Dip the cones in chocolate and fill them closer to serving time, ideally within a few hours, to ensure the waffle cone remains crisp and the chocolate doesn’t soften too much from the fruit’s moisture.
What if my chocolate seizes up when dipping?
If your chocolate seizes (becomes thick and clumpy), it usually means a tiny bit of water or steam got into it. The best fix is to add a tablespoon of vegetable oil or a neutral-flavored shortening to the melted chocolate and stir vigorously. This often helps to smooth it out and make it dippable again.
Chocolate Dipped Fruit Filled Cones
A delightful treat combining crispy cones, fresh fruit, and rich chocolate.
Ingredients
-
2 cups fresh strawberries, hulled and quartered
-
1 cup fresh blueberries
-
1 cup fresh raspberries
-
1/2 cup heavy cream
-
2 tablespoons granulated sugar
-
1 teaspoon vanilla extract
-
1/2 cup semi-sweet chocolate chips
-
1 tablespoon coconut oil
-
8 sugar cones
Instructions
-
Step 1
Prepare the fruit filling: In a medium bowl, gently toss the strawberries, blueberries, and raspberries. If desired, you can lightly mash a few strawberries to release some juice. -
Step 2
Make the whipped cream: In a separate bowl, whip the heavy cream, granulated sugar, and vanilla extract until stiff peaks form. -
Step 3
Assemble the cones: Spoon a generous amount of the fruit mixture into the bottom of each sugar cone, filling it about halfway. -
Step 4
Top the fruit with a dollop of whipped cream. -
Step 5
Melt the chocolate: In a microwave-safe bowl, combine the semi-sweet chocolate chips and coconut oil. Microwave in 30-second intervals, stirring between each, until smooth and fully melted. -
Step 6
Dip the cones: Hold each cone by the tip and dip the top (whipped cream and fruit portion) into the melted chocolate, allowing any excess to drip off. -
Step 7
Place the dipped cones on a parchment-lined baking sheet and refrigerate for at least 15-20 minutes, or until the chocolate has set.
Important Information
Nutrition Facts (Per Serving)
It is important to consider this information as approximate and not to use it as definitive health advice.
Allergy Information
Please check ingredients for potential allergens and consult a health professional if in doubt.