Restaurant Style Blender Salsa- Easy & Fresh Recipe
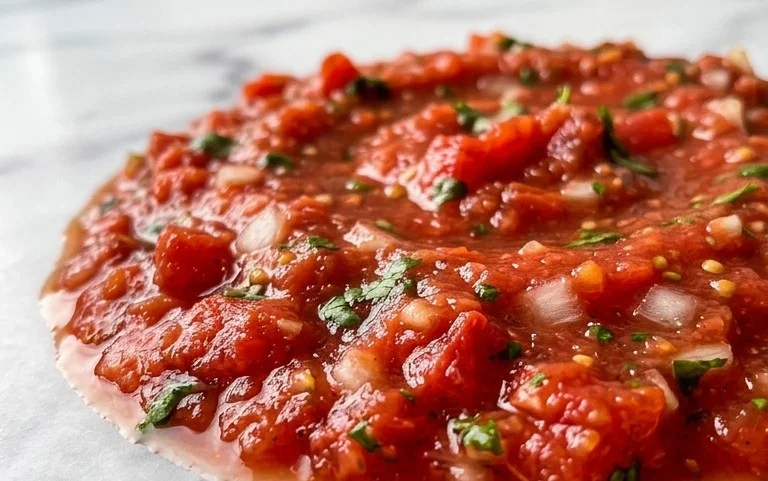
Blender Salsa (Restaurant Style Salsa) is the holy grail of dips, isn’t it? That vibrant, perfectly balanced salsa you get at your favorite Mexican restaurant, the one that vanishes before the main course even arrives. We’ve all been there, scooping up spoonfuls of that fresh, zesty goodness and wishing we could recreate it at home. Well, prepare to be amazed, because achieving that authentic, restaurant-quality flavor is surprisingly simple with our incredible Blender Salsa recipe. What makes it so special? It’s the way the ingredients meld together, the perfect ratio of tomato to onion to jalapeño, all whizzed into a smooth, yet still chunky, texture that screams freshness. Forget those store-bought jars; this Blender Salsa (Restaurant Style Salsa) will be your new go-to for game nights, taco Tuesdays, or just Tuesday afternoons when you need a flavor explosion.
Blender Salsa (Restaurant Style Salsa)
There’s something incredibly satisfying about a really good, fresh salsa. You know the kind – the vibrant, slightly chunky, perfectly seasoned salsa that shows up in a basket of warm tortilla chips at your favorite Mexican restaurant. It’s an appetizer that can make or break the meal, and for so long, I thought replicating that magic at home was an impossible feat. That is, until I discovered the simple genius of blender salsa. Forget tedious chopping and painstaking dicing; this recipe leverages the power of your blender to create that authentic, restaurant-style salsa in mere minutes. It’s incredibly easy, remarkably versatile, and so much fresher than anything you’ll find in a jar. Get ready to elevate your taco nights, your nacho platters, and frankly, anything that could benefit from a burst of zesty, spicy goodness.
Ingredients:
Crafting Your Perfect Blender Salsa
This recipe is designed for speed and simplicity, but don’t let that fool you into thinking it compromises on flavor. The key to achieving that desirable restaurant texture and taste lies in a few smart ingredient choices and the controlled pulsing of your blender. We’re not aiming for a smooth purée here; we want a beautiful, slightly textured salsa that still has some bite to it.
Step-by-Step Salsa Creation
1. Prepare Your Base: The foundation of our vibrant salsa begin extracts with the canned diced tomatoes. It’s crucial that you do NOT drain them. The liquid from the tomatoes will help your blender process the other ingredients smoothly, creating the perfect consistency. Pour the entire can, juices and all, directly into your blender. This provides a good liquid base and the body of the salsa.
2. Add the Aromatics and Heat: Now, let’s bring in those essential flavor boosters. Add the coarsely chopped red onion to the blender. Red onion provides a lovely sweet and slightly sharp flavor that’s characteristic of great salsa. Next, toss in the fresh cilantro. Don’t be shy with the cilantro; it adds a bright, herbaceous note that cuts through the richness. Then, introduce the heat. For a classic salsa, a seeded and coarsely chopped jalapeno pepper is perfect. If you prefer a spicier kick, feel free to substitute a Serrano pepper, or even leave some of the seeds in if you’re feeling adventurous. Finally, add the coarsely chopped garlic cloves. The garlic provides a pungent depth that complements the other ingredients beautifully. Coarsely chopping these aromatics before adding them helps them break down more easily in the blender.
3. Introduce the Zest, Spice, and Acidity: To really elevate the flavor profile and bring in that authentic tang, we’ll add the lime. First, zest the entire lime, ensuring you get all that fragrant citrus oil into the blender. This is a secret weapon for intense lime flavor without making the salsa too watery. Then, cut the lime in half and squeeze the juice from both halves into the blender. The acidity from the lime is vital for balancing the flavors and adding that signature brightness. Now, for a touch of earthy warmth, add the ground cumin. Cumin is a classic spice in many salsa recipes and adds a wonderful depth.
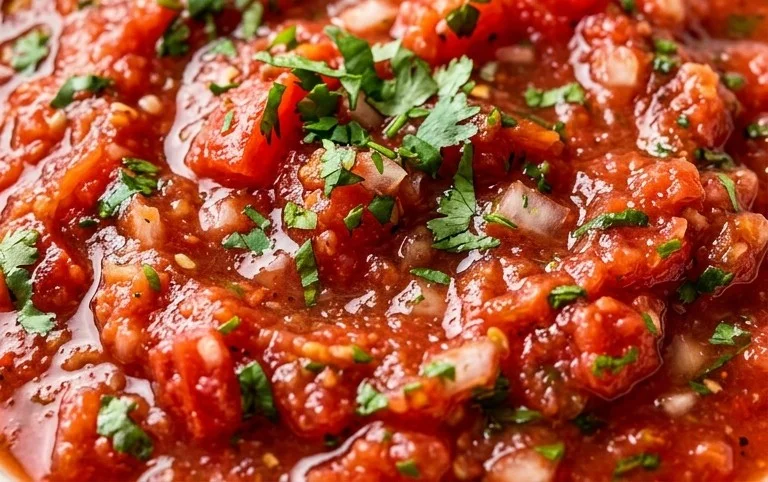
4. Pulse to Perfection: This is where the magic happens. Secure the lid on your blender. Begin extract by pulsing the ingredients. Pulse for just 5-10 seconds at a time. After each pulse, check the consistency. You want to break down the ingredients until they are finely chopped but still have some texture. Avoid over-blending, as this will result in a watery, smooth sauce rather than a chunky salsa. It’s better to under-pulse and then give it another quick zap than to accidentally create a purée. Aim for a texture that resembles finely chopped ingredients suspended in a juicy base.
5. Season and Adjust: Once you’ve achieved your desired consistency, it’s time to taste and season. Carefully remove the lid and give the salsa a good stir. Taste a small spoonful. This is where you’ll add salt and black pepper to your preference. Start with a pinch of salt and a grind of black pepper, stir well, and taste again. You might find you need a little more salt to bring out all the flavors, or perhaps a touch more black pepper for a subtle bite. If it’s not zesty enough for you, you can add a squeeze of extra lime juice. If it’s too spicy, you can stir in a little more diced tomato or even a tiny bit of sugar to mellow the heat. This step is all about personal preference and making the salsa truly yours.
Serving Your Homemade Masterpiece
Transfer your freshly made blender salsa to a serving bowl. For the best flavor, I highly recommend letting it sit for at least 15-30 minutes in the refrigerator before serving. This allows the flavors to meld and deepen, creating an even more complex and delicious salsa. Serve it with warm tortilla chips, and watch it disappear! It’s also fantastic spooned over tacos, burritos, quesadillas, grilled chicken, or even scrambled eggs. Enjoy this easy, delicious, restaurant-style salsa that’s sure to become a staple in your kitchen.
Conclusion:
And there you have it – your very own restaurant-style blender salsa, made fresh in minutes! This recipe is a game-changer because it’s incredibly easy, surprisingly quick, and delivers that vibrant, authentic flavor you love from your favorite taquerias. The beauty of this blender salsa lies in its simplicity, allowing the fresh ingredients to shine through. It’s the perfect way to elevate any meal or snack. Don’t be afraid to experiment with it! Serve it as a dip with tortilla chips, spoon it over tacos, enchiladas, or grilled meats, or even add a dollop to your morning eggs for a zesty kick. For variations, consider adding a pinch of smoked paprika for depth, a touch of dried oregano for an herbaceous note, or even a splash of lime juice for extra tang. You could also swap out some of the jalapeños for a milder serrano pepper, or add a small piece of roasted red bell pepper for sweetness. I truly encourage you to give this simple yet delicious blender salsa recipe a try. You’ll be amazed at how effortless it is to achieve such fantastic results right in your own kitchen.
Frequently Asked Questions:
Q1: How long does this blender salsa last in the refrigerator?
This fresh blender salsa is best enjoyed within 3-5 days when stored in an airtight container in the refrigerator. The flavors tend to meld and develop even further over the first day.
Q2: Can I adjust the spice level of the salsa?
Absolutely! The spice level is entirely up to you. To make it milder, remove the seeds and membranes from the jalapeño peppers before blending. For a spicier salsa, leave them in, or even add an extra jalapeño or a small piece of a hotter pepper like a habanero (handle with care!).
Q3: My salsa is too thick. How can I thin it out?
If your blender salsa is a bit too thick for your liking, simply add a tablespoon or two of water or more lime juice while the blender is running until you reach your desired consistency. You can also add a little more olive oil.
Blender Salsa (Restaurant Style Salsa)
Quick and easy restaurant-style salsa made in a blender with fresh ingredients.
Ingredients
-
1 (14.5-ounce can) Diced Tomatoes (don’t drain)
-
1/4 small Red Onion (about 1/3 cup coarsely chopped)
-
1/4 cup Cilantro
-
1 Lime (zested and juiced)
-
1 Jalapeno Pepper (or Serrano Pepper) (seeded and coarsely chopped)
-
2 cloves Garlic (coarsely chopped)
-
1/4 teaspoon Ground Cumin
-
Salt (to taste)
-
Black Pepper (to taste)
Instructions
-
Step 1
Add the undrained diced tomatoes, red onion, cilantro, lime zest, lime juice, jalapeno (or serrano) pepper, and garlic to a blender. -
Step 2
Pulse the ingredients until the salsa reaches your desired consistency. Start with short pulses and increase as needed for a smoother or chunkier salsa. -
Step 3
Add the ground cumin to the blender. -
Step 4
Season with salt and black pepper to taste. Pulse briefly to incorporate. -
Step 5
Transfer the salsa to a bowl or airtight container. -
Step 6
For best flavor, let the salsa sit for at least 15-30 minutes before serving to allow the flavors to meld.
Important Information
Nutrition Facts (Per Serving)
It is important to consider this information as approximate and not to use it as definitive health advice.
Allergy Information
Please check ingredients for potential allergens and consult a health professional if in doubt.