Easy 4th of July Snack Mix Recipe – Crowd Pleaser
The 4th of July Snack Mix is an absolute must-have for any celebration, and I’m so excited to share my go-to recipe with you all! As soon as those fireworks start to gleam and the grills sizzle, my mind immediately goes to this perfect blend of salty, sweet, and crunchy goodness. It’s the ultimate crowd-pleaser, disappearing faster than sparklers on a summer night. What I love most about this 4th of July Snack Mix is its incredible versatility and how it brings everyone together. It’s not just a snack; it’s a conversation starter, a portable party in a bowl, and a delightful way to fuel up for all the fun. This isn’t just any old trail mix; it’s a carefully curated explosion of flavors and textures that perfectly embodies the spirit of Independence Day. Get ready to impress your guests with this irresistible treat that will have them beggin extractg for the recipe!
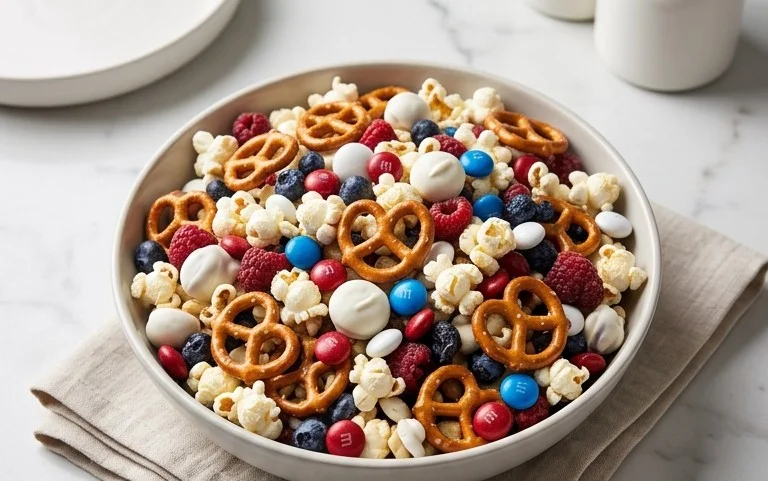
4th of July Snack Mix
Get ready to celebrate Independence Day with a treat that’s as vibrant and fun as the fireworks themselves! This 4th of July Snack Mix is the ultimate crowd-pleaser, perfect for barbecues, picnics, or just a festive movie night at home. It’s a delightful blend of crunchy, sweet, and salty, with a patriotic pop of color that will have everyone reaching for more. Unlike complicated desserts, this snack mix is incredibly easy to assemble, making it ideal for any skill level in the kitchen. Plus, the customizable nature means you can easily adjust it to your family’s favorite flavors and textures. Let’s dive into creating this irresistible, festive treat!
Ingredients:
Let’s Get Mixing!
This recipe is all about simplicity and fun, and the best part is that there’s minimal cooking involved. We’re essentially creating a delicious coating for our crunchy cereal and pretzels, then adding in those irresistible colorful candies.
Step 1: Prepare Your Base
First, gather all your dry ingredients and a very large mixing bowl. We’re going to combine the base of our snack mix. Into the large bowl, add the 2 cups of Chex cereal (you can use corn Chex for a slightly sweeter note or rice Chex for a more neutral base – a mix of both is also fantastic!), the 1 cup of mini pretzel twists (if you’re using pretzel rods, give them a gentle break into bite-sized pieces), the 2 cups of Cap’n Crunch cereal (make sure it’s the plain version, not the berry kind, to keep our color scheme intact!), and the 2 cups of Honey Nut Cheerios. Give everything a gentle toss with your hands or a large spoon to ensure a good mix. The goal here is to create an even distribution of all these wonderful textures and flavors.
Step 2: Melt the White Chocolate Coating
Now, it’s time to create our luscious white chocolate coating. You’ll need a microwave-safe bowl for this. Place the 1-1/2 bags (which is about 2-3/4 cups) of white chocolate chips into the bowl. Add the 1-1/2 teaspoons of coconut oil (or vegetable oil). The oil helps to make the chocolate smoother and easier to melt, preventing it from seizing up and becoming grainy. Microwave the chocolate chips and oil in 30-second intervals, stirring well after each interval. Be patient! White chocolate can be a bit finicky, so it’s better to melt it slowly and gently than to risk burning it. Continue microwaving and stirring until the chocolate is completely smooth and pourable. You want a consistency that will easily coat all the crunchy ingredients without being too thick.
Step 3: Coat the Mix
Once your white chocolate is perfectly melted and smooth, it’s time to bring it all together. Pour the melted white chocolate mixture over the dry ingredients in your large mixing bowl. This is where the magic happens! Using a large spatula or your clean hands (which is often the most effective way to ensure everything gets coated), gently fold and stir the mixture. Continue to mix until every piece of cereal and pretzel is generously coated in the creamy white chocolate. It might seem like a lot of chocolate at first, but keep folding and mixing, and you’ll see it start to distribute evenly. This step is crucial for ensuring that every bite is packed with that delicious white chocolate goodness.
Step 4: Add the Patriotic Flair
Now for the fun and festive part – adding those pops of red, white, and blue! Once your base is well-coated with white chocolate, gently fold in the 1 cup of red, white, and blue M&M’s. If you’re using regular M&M’s and want to enhance the patriotic theme, you can always add a few extra red and blue ones here. Be careful not to overmix at this stage, as you don’t want to break up the M&M’s or smudge their colors into the white chocolate too much. We want those distinct colors to shine through. If you’ve opted for the festive sprinkles, now is also the time to add them. Sprinkle them over the mix and give it another gentle fold to distribute them. These sprinkles will add a delightful sparkle and extra visual appeal, making your snack mix truly festive.
Step 5: Set and Serve
The final step is to let your beautiful snack mix set. You have a couple of options here. For a firmer set, you can spread the snack mix in a single layer onto parchment paper-lined baking sheets. This will allow the white chocolate to harden evenly. You can also leave it in the large bowl, but it will take longer to set, and the pieces might clump together more. Once spread out, allow it to sit at room temperature for at least 30-60 minutes, or until the white chocolate is completely firm. If you’re in a hurry, you can pop the baking sheets into the refrigerator for about 15-20 minutes. Once set, you can break apart any larger clumps if necessary. Your spectacular 4th of July Snack Mix is now ready to be served! Store any leftovers in an airtight container at room temperature. Enjoy this delightful, homemade patriotic treat with all your loved ones!

Conclusion:
There you have it – the ultimate 4th of July Snack Mix recipe that’s sure to be a star at any celebration! This recipe is fantastic because it’s incredibly customizable, incredibly delicious, and incredibly easy to whip up, freeing you up to enjoy the festivities. The combination of sweet, salty, and crunchy elements makes it irresistible to everyone, from kids to adults. It’s the perfect make-ahead snack that travels well, making it ideal for picnics, barbecues, or even just watching fireworks from your backyard.
For serving, I love to present this 4th of July Snack Mix in festive bowls or even small mason jars for individual portions. It pairs wonderfully with cold drinks and is a welcome alternative to heavier appetizers. Don’t be afraid to get creative with variations! Consider adding a sprinkle of red and blue sprinkles for extra patriotic flair, or perhaps some white chocolate drizzle. You could also swap out some of the pretzels for bugles or cheesy crackers. I truly encourage you to give this recipe a try; it’s a guaranteed crowd-pleaser and brings a little extra sparkle to your holiday gathering.
Frequently Asked Questions:
Q: How long can I store this 4th of July Snack Mix?
You can store this snack mix in an airtight container at room temperature for up to a week. Make sure it’s completely cooled before sealing to prevent any soggin extractess.
Q: Can I make this snack mix gluten-free?
Absolutely! Simply swap the regular pretzels for your favorite gluten-free pretzel option. Many brands offer delicious gluten-free pretzels that will work perfectly in this recipe.
4th of July Snack Mix
A festive and easy-to-make snack mix perfect for patriotic celebrations, featuring a blend of cereals, pretzels, chocolate, and patriotic candies.
Ingredients
-
2 cups Chex cereal (corn or rice)
-
1 cup mini pretzel twists
-
2 cups Cap’n Crunch cereal (without berries)
-
2 cups Honey Nut Cheerios cereal
-
1 cup red, white, and blue M&M’s
-
1-1/2 bags (16 ounces total) white chocolate chips
-
1-1/2 teaspoons coconut oil
-
2 tablespoons festive sprinkles
Instructions
-
Step 1
In a very large bowl, combine the Chex cereal, mini pretzel twists, Cap’n Crunch cereal, and Honey Nut Cheerios cereal. Gently stir to combine. -
Step 2
Place the white chocolate chips and coconut oil in a microwave-safe bowl. Microwave on 50% power for 30-second intervals, stirring after each, until melted and smooth. -
Step 3
Pour the melted white chocolate over the cereal and pretzel mixture. Stir gently until everything is evenly coated. -
Step 4
Add the red, white, and blue M&M’s and festive sprinkles. Stir until well distributed throughout the mix. -
Step 5
Spread the snack mix in a single layer on parchment paper-lined baking sheets to set. This will help prevent clumping. -
Step 6
Allow the snack mix to cool completely and harden, about 15-20 minutes. -
Step 7
Once hardened, break apart any large clumps and store in an airtight container at room temperature.
Important Information
Nutrition Facts (Per Serving)
It is important to consider this information as approximate and not to use it as definitive health advice.
Allergy Information
Please check ingredients for potential allergens and consult a health professional if in doubt.