Piped Rainbow Shortbread Cookies- Easy Fun Recipe
Piped Rainbow Shortbread Cookies are more than just a sweet treat; they’re a vibrant celebration in every bite! Imagin extracte the delightful crunch of buttery shortbread, melting in your mouth, but elevated with a stunning visual spectacle. Who doesn’t adore the simple elegance of shortbread? It’s a timeless classic for a reason – its rich, melt-in-your-mouth texture and pure butter flavor are universally loved. But these Piped Rainbow Shortbread Cookies take that beloved base and transform it into something truly magical. What makes them so special is the whimsical artistry involved. The delicate piping of colorful dough in cheerful rainbow patterns transforms ordinary cookies into edible masterpieces, perfect for brightening any occasion, from birthday parties to a simple afternoon tea. Get ready to unleash your inner artist and bake a batch of pure joy!

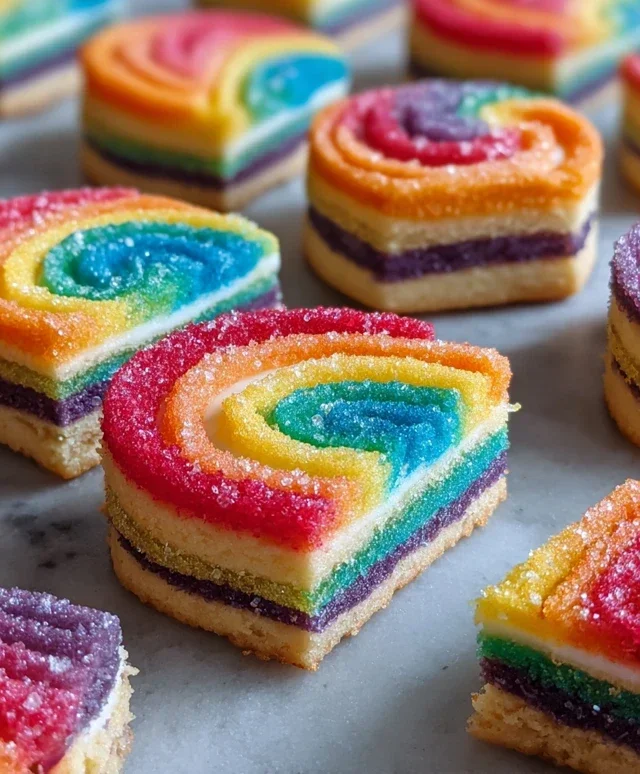
Piped Rainbow Shortbread Cookies
Get ready to add a burst of color and delightful buttery crunch to your cookie jar with these Piped Rainbow Shortbread Cookies! These aren’t your average shortbread; we’re transforming simple ingredients into edible works of art. The process is surprisingly straightforward, involving a beautiful layering of colors before baking and a sweet finish. They’re perfect for parties, holidays, or just brightening up an ordinary afternoon. Let’s dive in and create some magic!
Ingredients:
Creating the Cookie Dough
The foundation of our beautiful rainbow cookies is a classic, buttery shortbread dough. The key to a tender and flaky shortbread is using softened, not melted, butter. This allows the butter to properly incorporate with the sugar and flour, creating pockets of air that contribute to the texture.
First, in a large bowl, whisk together the all-purpose flour, sugar, and salt. This ensures the dry ingredients are evenly distributed, preventing pockets of salt or sugar in your final cookies.
Next, add the softened, cubed unsalted butter to the dry ingredients. You can use a pastry blender, a stand mixer fitted with the paddle attachment, or even your fingertips to cut the butter into the flour mixture. The goal is to work the butter in until the mixture resembles coarse crum extractbs, with some pea-sized pieces of butter still visible. Don’t overmix at this stage; we’re not looking for a smooth paste yet.
Dividing and Coloring the Dough
This is where the magic begin extracts! We’ll divide our crum extractbly shortbread mixture into portions to color. Aim for four equal portions, as we have four colors of gel food coloring. Place each portion into a separate bowl.
Now, add a few drops of your chosen gel food coloring to each bowl of dough. Gel food coloring is fantastic because it’s highly concentrated, meaning you get vibrant colors without adding too much extra liquid to the dough, which could affect its texture. Start with a small amount and add more until you achieve your desired shade. It’s always better to start light and build up the color.
Gently knead each portion of dough with your hands until the color is evenly distributed. Be mindful not to overwork the dough. The warmth from your hands will help the dough come together, but too much kneading can develop the gluten, resulting in tougher cookies. You want a cohesive dough that holds together when squeezed.
Assembling the Rainbow Layers
Once your dough is beautifully colored, it’s time to assemble the rainbow! This is the most visually exciting part. On a clean, lightly floured surface, take one color of dough and gently press or roll it into a rectangular shape, roughly ¼ inch thick. The size of your rectangle will determine the size of your finished cookies. Aim for something manageable, perhaps around 6×4 inches.
Repeat this process with your other three colors of dough, aiming for rectangles of similar size and thickness. You want the layers to be as uniform as possible for even baking and a clean presentation.
Now, carefully stack the colored dough rectangles on top of each other. The order of your colors is up to you – traditional rainbow order (red, orange, yellow, green) is beautiful, or you can create your own unique spectrum extract. Gently press the layers together to ensure they adhere.
Once you have your stacked rectangle of colored dough, it’s time to roll it into a log. Starting from one of the longer sides, gently but firmly roll the dough into a tight log, about 1.5 to 2 inches in diameter. As you roll, keep an eye on the layers to ensure they stay stacked and don’t shift too much. A tight log will give you defined layers in your cookies.
Chilling and Slicing the Dough
After shaping your colorful log, wrap it tightly in plastic wrap. This is a crucial step for shortbread. Chilling the dough allows the butter to firm up, which makes it much easier to slice without the dough crum extractbling or the layers smearing. It also helps the flavors meld and develop further. Place the wrapped dough log in the refrigerator for at least 1 hour, or until it’s firm enough to slice cleanly. You can even prepare this dough a day in advance and chill it overnight.
Once the dough is well-chilled, unwrap the log and place it on a cutting board. Using a sharp knife, slice the log into cookies that are about ¼ to ⅓ inch thick. Again, a sharp knife is your best friend here to achieve clean cuts. If the dough feels too soft, pop it back in the freezer for 10-15 minutes to firm up again before slicing.
Baking and Decorating Your Rainbow Masterpieces
Preheat your oven to 350°F (175°C). Line baking sheets with parchment paper or silicone baking mats. Arrange the sliced cookie dough rounds on the prepared baking sheets, leaving about 1 inch of space between them. They don’t spread much, but a little breathing room is always good.
Bake for 12-15 minutes, or until the edges are lightly golden brown and the centers are set. Keep a close eye on them, as shortbread can go from perfectly baked to overdone very quickly.
While the cookies are baking, prepare your white melting wafers. Place them in a microwave-safe bowl and heat in 30-second intervals, stirring between each interval, until smooth and melted. Be careful not to overheat them, as they can seize up.
Once the cookies are out of the oven and have cooled on the baking sheets for a few minutes, transfer them to a wire rack to cool completely. This is important for the melting wafers to adhere properly.
Once the cookies are fully cooled, you can get creative with the decoration. Dip half of each cookie into the melted white chocolate, allowing any excess to drip back into the bowl. Immediately sprinkle the chocolate-dipped portion with rainbow nonpareils before the chocolate sets. You can also drizzle the melted white chocolate over the cookies or use a piping bag to create decorative patterns. Let the chocolate set completely before storing.
These Piped Rainbow Shortbread Cookies are a delightful treat that’s as fun to make as they are to eat. Enjoy every colorful, buttery bite!
Conclusion:
There you have it! These Piped Rainbow Shortbread Cookies are an absolute delight, offering a beautiful visual spectacle and a melt-in-your-mouth buttery taste that’s simply irresistible. The joy of creating these vibrant swirls, whether for a special occasion or just to brighten someone’s day, is incredibly rewarding. They’re perfect for celebrations, afternoon tea, or simply as a sweet treat to share with loved ones. Don’t hesitate to experiment with different color combinations or even add a hint of citrus zest to the dough for an extra burst of flavor!
I truly encourage you to give this Piped Rainbow Shortbread Cookie recipe a try. It’s a fun and achievable project that yields stunning results. The satisfaction of presenting these colorful creations will be well worth the effort. Get your piping bags ready and let the rainbow baking begin extract!
Frequently Asked Questions:
Q: My piped lines aren’t holding their shape. What can I do?
A: This often happens if the dough is too warm. Ensure your dough is well-chilled before piping. If it starts to soften too much during piping, pop the tray back into the refrigerator for 10-15 minutes before baking.
Q: Can I make these cookies ahead of time?
A: Absolutely! The dough can be made a day or two in advance and stored, wrapped tightly, in the refrigerator. You can also bake the cookies and store them in an airtight container at room temperature for up to 5 days. They’re wonderful for making a batch for a party!
Q: What are some other fun color combinations I could use?
A: The possibilities are endless! Try a gradient effect with shades of one color, or go for a classic red, white, and blue theme. Pastel colors can create a softer, more whimsical look, while jewel tones offer a sophisticated flair. Get creative and have fun with it!
Piped Rainbow Shortbread Cookies
Delightful shortbread cookies piped with vibrant rainbow colors, finished with a sweet white chocolate drizzle and rainbow sprinkles.
Ingredients
-
2¼ cups all-purpose flour
-
¾ cup sugar
-
¼ tsp salt
-
1 cup unsalted butter, cut into pieces
-
Gel food coloring (4 colors of your choice)
-
1 cup white melting wafers
-
Rainbow nonpareils
Instructions
-
Step 1
In a large bowl, whisk together the all-purpose flour, sugar, and salt. -
Step 2
Cut in the cold butter pieces using a pastry blender or your fingertips until the mixture resembles coarse crumbs. -
Step 3
Divide the dough into four equal portions. Tint each portion with a different gel food coloring. Wrap each portion in plastic wrap and refrigerate for at least 30 minutes. -
Step 4
Preheat oven to 350°F (175°C). Line baking sheets with parchment paper. -
Step 5
Roll out each colored dough portion thinly (about 1/4 inch thick) on a lightly floured surface. Stack the colored sheets, lightly pressing them together. Roll over the stack gently to fuse them slightly. Cut into desired shapes or roll into a log and slice. -
Step 6
Place cookies on prepared baking sheets and bake for 12-15 minutes, or until the edges are lightly golden. -
Step 7
Let cookies cool on the baking sheets for a few minutes before transferring them to a wire rack to cool completely. -
Step 8
Melt the white melting wafers according to package directions. Drizzle over the cooled cookies and immediately sprinkle with rainbow nonpareils.
Important Information
Nutrition Facts (Per Serving)
It is important to consider this information as approximate and not to use it as definitive health advice.
Allergy Information
Please check ingredients for potential allergens and consult a health professional if in doubt.