Easy Scones Recipe-Fluffy Perfect Bake
Scones recipes are a doorway to pure, unadulterated comfort, aren’t they? There’s something utterly magical about a perfectly baked scone. It’s that delightful contrast – the slightly crisp exterior yielding to a soft, crum extractbly interior, beggin extractg to be slathered with clotted cream and a dollop of jam. People adore scones for their versatility; they’re equally at home for a fancy afternoon tea as they are for a quick, satisfying breakfast with a steaming cup of coffee. What truly makes this scone recipe special is its simplicity and the incredible results it yields. We’re talking about a recipe that’s foolproof, delivering that quintessential scone experience every single time. Prepare to impress yourself and anyone lucky enough to share these delightful creations with you!

Scones Recipe
There’s something incredibly comforting about a warm, homemade scone, fresh from the oven. Whether you’re a seasoned baker or just starting out, this recipe is designed to be foolproof, yielding tender, fluffy scones that are perfect for breakfast, brunch, or an afternoon treat. The beauty of scones lies in their simplicity and their incredible versatility. Once you’ve mastered the basic technique, you can customize them with your favorite fruits, chocolate chips, or even a hint of spice. Let’s get baking!
Ingredients:
Preparing Your Baking Station and Ingredients
Before we dive into the mixing, it’s essential to have everything prepped and ready. This includes preheating your oven and preparing your baking sheet. A lightly floured surface will also be crucial for shaping your scones. Ensure your butter and heavy cream are thoroughly chilled. This is a key step for achieving flaky scones. Cold butter creates steam pockets in the dough as it bakes, leading to a lighter texture. Cutting the butter into small cubes helps it distribute more evenly throughout the flour.
Mixing the Dry Ingredients
In a large mixing bowl, whisk together the all-purpose flour, granulated sugar, baking powder, and salt. Whisking these dry ingredients together ensures that the leavening agent (baking powder) and salt are evenly distributed, which will help your scones rise uniformly.
Incorporating the Cold Butter
Now, add the chilled, cubed unsalted butter to the dry ingredients. Using your fingertips, a pastry blender, or a food processor on a pulse setting, work the butter into the flour mixture until it resembles coarse crum extractbs with some pea-sized pieces of butter remaining. It’s important not to overwork the dough at this stage. Those little pieces of butter are what give scones their signature tender and flaky texture. If you’re using your hands, rub the butter into the flour quickly, trying to keep your hands cool.
Adding the Wet Ingredients and Mix-ins
In a separate small bowl, whisk together the ½ cup plus 1 tablespoon of chilled heavy cream and the lightly beaten large egg. Make a well in the center of the flour and butter mixture and pour in the cream and egg mixture. Gently stir with a fork or a spatula until the dough just begin extracts to come together. Be careful not to overmix. Overmixing can develop the gluten in the flour, resulting in tough scones.
At this point, if you’re adding any mix-ins, gently fold them into the dough. Don’t overwork the dough while incorporating your chosen additions. If you’re using fresh berries, for example, you might want to toss them in a tablespoon of flour before adding them to the dough to prevent them from bleeding too much color.
Shaping Your Scones
Turn the dough out onto a lightly floured surface. Gently bring the dough together and pat it into a disc about ¾ to 1 inch thick. You can then cut the disc into wedges, like a pizza, or use a round biscuit cutter for more uniform shapes. If you’re using a biscuit cutter, dip it in flour each time before cutting to prevent sticking. Reworking the dough as little as possible is key. Don’t push down too hard on the cutter, as this can also compress the dough and lead to denser scones. You want to encourage air to get into the dough.
Baking Your Delicious Scones
Preheat your oven to 400°F (200°C). Line a baking sheet with parchment paper. Arrange the shaped scones on the prepared baking sheet, leaving a little space between them. For an extra golden-brown finish, brush the tops of the scones with a little extra heavy cream. You can also sprinkle a little granulated sugar on top if you like a bit of crunch.
Bake for 15-20 minutes, or until the scones are golden brown and a toothpick inserted into the center comes out clean. The exact baking time will depend on your oven and the size of your scones. Keep an eye on them towards the end of the baking period to prevent them from burning.
Serving Your Freshly Baked Scones
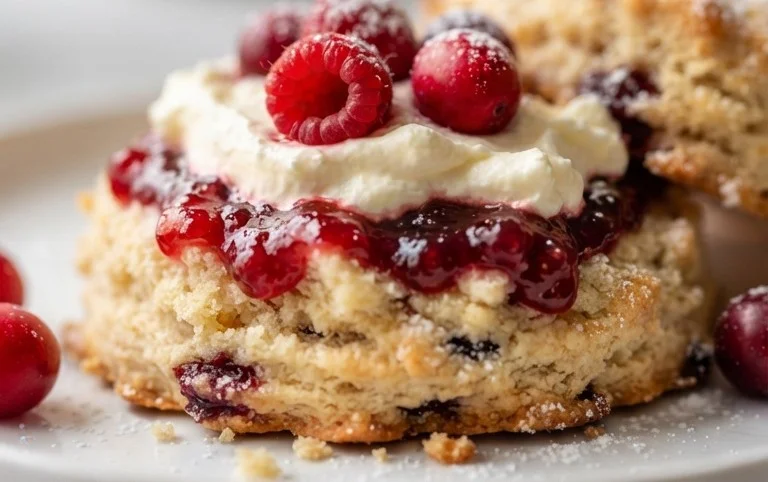
Once baked, transfer the scones to a wire rack to cool slightly. They are best enjoyed warm, served with your favorite accompaniments. Classic pairings include clotted cream and jam, butter, or even a drizzle of honey. These scones are so simple to make and so incredibly rewarding. The aroma alone will fill your kitchen with warmth and anticnon-alcoholic ipation. Enjoy the fruits of your labor!
Conclusion:
And there you have it! This scones recipe is truly a gem for anyone looking to whip up a batch of delightfully tender and flavourful scones. Its simplicity is its superpower, making it accessible for bakers of all levels. The magic lies in the delicate balance of ingredients, resulting in a light crum extractb that’s perfect for soaking up your favourite toppings. These scones are incredibly versatile, shining brightly whether served warm for a weekend brunch, as an afternoon tea treat, or even as a sweet accompaniment to a savoury meal. Don’t be afraid to experiment with the suggested variations – adding fresh berries, a hint of citrus zest, or even a sprinkle of chocolate chips can elevate your scones to new heights. I truly encourage you to give this scones recipe a try; the satisfaction of pulling a fresh batch from the oven is unparalleled!
Frequently Asked Questions:
Can I make the dough for these scones ahead of time?
Yes, you can prepare the dough and wrap it tightly in plastic wrap, then refrigerate for up to 24 hours. When you’re ready to bake, let it sit at room temperature for about 15-20 minutes to make it easier to handle. You might need to add a tiny bit more flour if it feels too sticky.
What’s the best way to store leftover scones?
For the freshest taste, store cooled scones in an airtight container at room temperature for up to 2 days. If you plan to keep them longer, wrap them tightly and freeze them for up to a month. Reheat gently in a low oven or toaster oven to revive their texture.
Classic Scones Recipe
A simple and versatile recipe for delicious, tender scones, perfect for breakfast or afternoon tea. Customize with your favorite mix-ins!
Ingredients
-
6 tablespoons unsalted butter
-
2 cups all-purpose flour
-
⅓ cup granulated sugar
-
1 tablespoon baking powder
-
½ teaspoon salt
-
½ cup plus 1 tablespoon heavy cream
-
1 large egg (lightly beaten)
-
up to 1 cup total mix-ins, as desired (e.g., blueberries, chocolate chips)
Instructions
-
Step 1
Preheat oven to 400°F (200°C). Line a baking sheet with parchment paper. -
Step 2
In a large bowl, whisk together the all-purpose flour, granulated sugar, baking powder, and salt. -
Step 3
Cut in the cold unsalted butter using a pastry blender or your fingertips until the mixture resembles coarse crumbs. -
Step 4
In a separate bowl, whisk together the heavy cream and the lightly beaten egg. Add this to the dry ingredients and stir until just combined. Do not overmix. -
Step 5
Gently fold in your desired mix-ins, if using. -
Step 6
Turn the dough out onto a lightly floured surface. Pat or gently roll it into a ¾-inch thick round. Cut into 8 wedges or use a biscuit cutter for rounds. -
Step 7
Place the scones on the prepared baking sheet. Brush the tops with a little extra heavy cream. -
Step 8
Bake for 15-20 minutes, or until golden brown and a toothpick inserted into the center comes out clean.
Important Information
Nutrition Facts (Per Serving)
It is important to consider this information as approximate and not to use it as definitive health advice.
Allergy Information
Please check ingredients for potential allergens and consult a health professional if in doubt.