Easy Keto Bread Rolls – Delicious Low Carb Recipe
Keto bread rolls are the unsung heroes of a low-carb lifestyle, and let me tell you, they are a game-changer! For so long, the idea of enjoying a warm, soft roll with my keto meals felt like a distant dream. But after countless experiments and a whole lot of deliciousness, I’ve finally cracked the code to creating truly amazing keto bread rolls that are light, fluffy, and have that satisfying chew we all crave. You’re going to love these because they banish the crum extractbly, dry disappointments of the past and deliver pure bread bliss. What makes these particular keto bread rolls so special is the unique combination of ingredients that creates a perfect texture and a flavor that will have you reaching for seconds (and maybe thirds!). Get ready to elevate your sandwiches, your soups, and your entire keto experience!
The Quest for the Perfect Bite
Why These Rolls Will Become Your New Favorite
Keto Bread Rolls: Your New Go-To Low-Carb Treat
Craving a warm, comforting bread roll but sticking to a ketogenic lifestyle? I understand the struggle! Finding a satisfying, low-carb alternative to traditional bread can feel like searching for a unicorn. That’s why I’m so excited to share this recipe for Keto Bread Rolls. These little wonders are surprisingly easy to make, incredibly versatile, and deliver that satisfying chew and flavor you’ve been missing. Forget dry, crum extractbly disappointments; these rolls are moist, tender, and have a delightful cheesy richness that makes them perfect on their own, alongside your favorite soup, or as a bun for your burgers. Get ready to impress yourself and anyone lucky enough to share these with you!
Ingredients:
Notes on Ingredients:
Regarding the cheese, a blend of mozzarella and cheddar works beautifully for flavor and that stretchy, melty texture. Mozzarella provides great elasticity, while cheddar adds a sharper, more pronounced cheesy taste. Feel free to experiment with other shredded low-carb cheeses like Monterey Jack or a good quality Italian blend. Just ensure it’s a good melting cheese for the best results.
For the eggs, we’ll be using the yolks and whites separately. This is a key step to achieving the right texture and lift in our rolls. The yolks contribute richness and fat, while the whipped egg whites will provide aeration and a lighter crum extractb. Make sure your eggs are at room temperature; they whip up much better this way.
The baking powder is technically optional, but I highly recommend it if you want an extra little boost in rise and a slightly fluffier texture. It’s a subtle addition that can make a noticeable difference.
Preparing to Bake: The Foundation of Success
Before we dive into mixing, it’s crucial to get your oven preheated and your baking sheet ready. This recipe benefits from a consistent oven temperature, so preheating is non-negotiable. Line a baking sheet with parchment paper. This prevents sticking and makes for easy cleanup, allowing your beautiful rolls to slide right off once they’re golden brown.
Step-by-Step Baking Bliss
Here’s how we’re going to transform these simple ingredients into delicious keto bread rolls:
Step 1: Melding the Cheesy Base
In a medium, microwave-safe bowl, combine your 2 cups of shredded cheese and 1/4 cup of softened cream cheese. You want the cream cheese to be soft enough that it easily incorporates into the shredded cheese. Microwave this mixture in 30-second intervals, stirring well after each interval, until both cheeses are completely melted and smoothly combined. This process usually takes about 1 to 2 minutes in total, depending on your microwave’s power. Stirring is key here to ensure an even melt and prevent any scorching. You’re looking for a smooth, gooey, homogenous cheese mixture. Once melted, remove from the microwave and let it cool slightly for about 5 minutes. This cooling period is important; you don’t want to scramble your eggs when you add them.
Step 2: Incorporating the Yolks and Dry Ingredients
Once the cheese mixture has cooled a bit, it’s time to add the egg yolks. Carefully separate your 3 large eggs, placing the yolks into the cheese mixture and the whites into a separate, clean, and dry bowl. Whisk the egg yolks into the cheese mixture until they are fully incorporated. Then, add your 1 1/2 cups of almond flour and, if using, the 1 teaspoon of baking powder. Stir everything together with a sturdy spoon or spatula until a thick dough forms. It will be quite sticky at this stage, and that’s perfectly normal. You might need to use your hands to really bring it all together towards the end, but try to avoid overmixing. Just ensure all the dry ingredients are incorporated into the wet base.
Step 3: Whipping the Egg Whites to Perfection
Now for the magic ingredient for lift: the egg whites! Take the bowl containing your 3 egg whites and, using an electric mixer (or a whisk and a lot of arm power!), beat them until stiff peaks form. This means that when you lift the beater out, the egg whites should stand up straight and hold their shape. This process can take anywhere from 2 to 5 minutes with an electric mixer. Be patient! Properly whipped egg whites are essential for creating those light and airy rolls. Make sure your bowl and beaters are absolutely free of any grease or yolk, as this will prevent the whites from whipping correctly.
Step 4: Gently Folding for Maximum Volume
This is where we combine the fluffy egg whites with our cheesy dough. Take about a third of the whipped egg whites and gently fold them into the cheese and almond flour mixture. Use a spatula and a gentle, sweeping motion, being careful not to deflate the egg whites too much. The goal is to lighten the dough. Once that’s incorporated, gently fold in the remaining whipped egg whites in two more additions until just combined. You want to see streaks of white still visible; overmixing will knock out all that precious air. The dough will become lighter and more voluminous.
Step 5: Shaping and Baking Your Delicious Rolls
Preheat your oven to 350°F (175°C). Using a spoon or a small ice cream scoop, portion the dough onto your prepared baking sheet. You should aim for about 8-10 rolls, depending on your desired size. If the dough is still a bit sticky, you can lightly dampen your hands with water to help shape them into round balls. Don’t worry about them being perfectly smooth; rustic is charming! Place them onto the baking sheet, leaving a little space between each roll to allow for expansion.
Bake in the preheated oven for 18-25 minutes, or until the rolls are golden brown on top and firm to the touch. The exact baking time will vary depending on your oven and the size of your rolls. Keep an eye on them towards the end of the baking time to prevent over-browning.
Allow the rolls to cool on the baking sheet for a few minutes before transferring them to a wire rack to cool completely. While they are absolutely divine warm, they also store well. Enjoy these wonderful keto bread rolls as part of your low-carb journey!

Conclusion:
You’ve made it! I hope you’re as excited to try these Keto Bread Rolls as I am about sharing them. This recipe is truly a game-changer for anyone following a ketogenic lifestyle or looking to reduce their carbohydrate intake without sacrificing the simple pleasure of fresh bread. The beauty of these rolls lies in their simplicity, wholesome ingredients, and incredible versatility. They boast a delightful texture that’s both soft and slightly chewy, a far cry from the dense, crum extractbly alternatives you might have encountered. These delicious Keto Bread Rolls are perfect for building your favorite sandwiches, enjoying alongside a hearty soup, or even as a quick and satisfying snack.
Feel free to get creative with variations! Consider adding herbs like rosemary or chives to the dough for an aromatic boost, or a sprinkle of sesame seeds or poppy seeds on top before baking for extra crunch and flavor. Experimenting is part of the fun! I truly encourage you to give these a go. You might be surprised at how easy and rewarding it is to create such a satisfying keto-friendly staple in your own kitchen.
Frequently Asked Questions:
Q: How do I store leftover Keto Bread Rolls?
A: Store them in an airtight container at room temperature for up to 2 days, or in the refrigerator for up to a week. For longer storage, you can slice them and freeze them in a freezer-safe bag. Simply toast them from frozen to enjoy.
Q: Can I use a different type of flour?
A: While this recipe is optimized for almond flour and coconut flour, you could experiment with other low-carb flours, but be aware that you may need to adjust the liquid content and baking time. It’s best to stick to the provided measurements for the most reliable results.
Q: Why are my Keto Bread Rolls a bit dense?
A: Density can sometimes be caused by overmixing the dough, which can activate gluten development if you’re using gluten-containing ingredients (though this recipe is typically gluten-free). Ensure you’re not overworking the batter and that your leavening agents (baking powder/soda) are fresh.
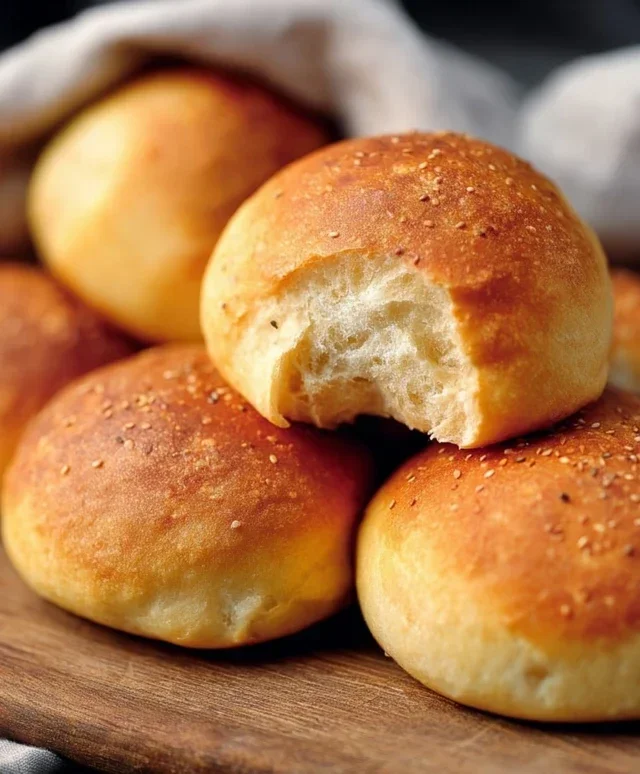
Keto Bread Rolls
Soft and chewy keto bread rolls perfect for sandwiches or as a side.
Ingredients
-
2 cups shredded cheese (mozzarella or cheddar)
-
1/4 cup cream cheese, softened
-
1 1/2 cups almond flour
-
3 large eggs, divided
-
1 teaspoon baking powder (optional)
Instructions
-
Step 1
Preheat oven to 350°F (175°C). Line a baking sheet with parchment paper. -
Step 2
In a microwave-safe bowl, combine shredded cheese and softened cream cheese. Microwave in 30-second intervals, stirring in between, until fully melted and combined. -
Step 3
Stir in almond flour and optional baking powder until a dough forms. -
Step 4
Separate the eggs. Whisk the egg whites until stiff peaks form. In a separate bowl, whisk the yolks. -
Step 5
Gently fold the egg yolks into the cheese and almond flour mixture. Then, carefully fold in the whipped egg whites until just combined. -
Step 6
Divide the dough into 8 equal portions and shape them into rolls. Place on the prepared baking sheet. -
Step 7
Bake for 20-25 minutes, or until golden brown and puffed.
Important Information
Nutrition Facts (Per Serving)
It is important to consider this information as approximate and not to use it as definitive health advice.
Allergy Information
Please check ingredients for potential allergens and consult a health professional if in doubt.