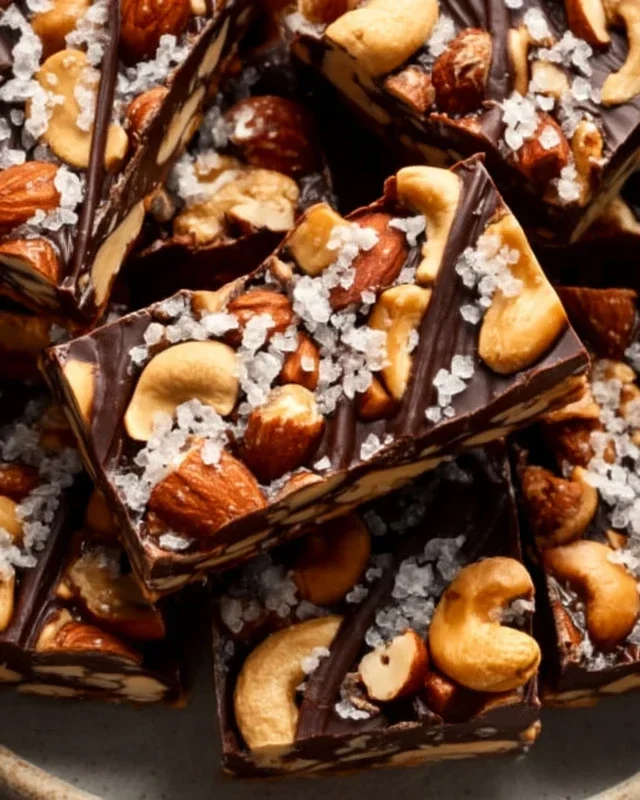
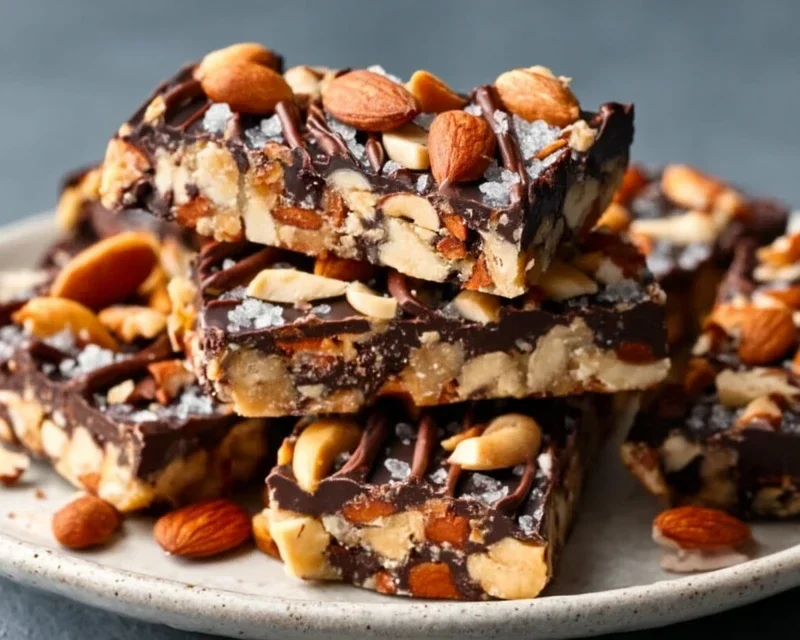
Dark Chocolate Sea Salt Nut Bars-Easy Recipe
Dark Chocolate and Sea Salt Nut Bars are more than just a snack; they’re a little piece of heaven you can whip up in your own kitchen. I don’t know about you, but I’m a sucker for that irresistible combination of rich, dark chocolate and the subtle, sophisticated bite of sea salt. It’s a pairing that’s been winning hearts for ages, and for good reason! These aren’t your average, store-bought granola bars. What makes these Dark Chocolate and Sea Salt Nut Bars so special is their perfect balance. You get the satisfying crunch of assorted nuts, the deep, complex flavor of good quality dark chocolate, and that magical sprinkle of sea salt that elevates every single bite from ordinary to extraordinary. They’re the ideal treat for an afternoon pick-me-up, a post-workout reward, or even a decadent dessert that feels incredibly wholesome.
Get Ready to Indulge
Discover the Ultimate Treat
The Ultimate Dark Chocolate and Sea Salt Nut Bars
There’s something incredibly satisfying about a homemade treat that’s both healthy-ish and utterly delicious. These Dark Chocolate and Sea Salt Nut Bars are my go-to for a quick energy boost, a post-workout reward, or even a sweet little something to share with friends. The combination of crunchy nuts, chewy puffed rice, rich dark chocolate, and that delightful hint of sea salt is simply divine. Plus, they’re incredibly easy to make, requiring no baking and minimal fuss. You can whip up a batch in no time, and they store beautifully, making them perfect for meal prep or having on hand for when that sweet craving strikes.
Ingredients:
Let’s Get Cooking!
The beauty of these bars lies in their simplicity. We’re essentially creating a delicious, no-bake mixture and binding it together with a simple chocolate coating. It’s a fantastic recipe to get kids involved in the kitchen too – just be mindful of the melted chocolate!
Step 1: Preparing Your Nuts and Base
The first step is all about getting our nutty foundation ready. If you’re using whole nuts, it’s best to give them a rough chop. This ensures that when you bite into the bar, you get a satisfying crunch without overwhelming your palate with huge nut pieces. I like to keep some nuts slightly larger for texture and some smaller. In a large bowl, combine your chopped nuts. Now, we’re going to add the puffed rice to this bowl. The puffed rice adds a wonderful lightness and crunch to the bars, preventing them from becoming too dense. Give everything a good stir to ensure the nuts and puffed rice are evenly distributed. This forms the bulk of our delicious bar.
Step 2: Creating the Binding Syrup
Next, we need to create the sticky binder that will hold everything together. In a small saucepan over low heat, combine the brown rice syrup and the 1/2 teaspoon of sea salt. Gently warm the syrup, stirring occasionally, until it’s just warm and pourable. We don’t want it to boil vigorously, just to loosen up and become more pliable. This warm syrup will act like magic, coating the nuts and rice and making them stick together. Once the syrup is warm, stir in the vanilla extract. The vanilla adds a lovely depth of flavor that complements the nuts and chocolate beautifully.
Step 3: Combining and Pressing the Mixture
Now for the fun part! Pour the warm brown rice syrup mixture over the nut and puffed rice mixture in the large bowl. Using a sturdy spatula or wooden spoon, stir everything together thoroughly. You want to make sure that every single nut and piece of puffed rice is coated in the sticky syrup. This might take a minute or two of enthusiastic stirring, but it’s crucial for ensuring your bars hold their shape. Once everything is well combined, transfer this mixture to a prepared baking dish. I like to use an 8×8 inch baking dish lined with parchment paper. The parchment paper is your best friend here, as it will make lifting the bars out of the dish so much easier later on. Use your spatula or the back of a spoon to press the mixture down firmly and evenly into the dish. The firmer you press, the more cohesive your bars will be.
Step 4: Melting and Coating with Chocolate
This is where the magic truly happens! In a heatproof bowl set over a saucepan of simmering water (or in the microwave on short bursts, stirring in between), melt the dark chocolate chips and the coconut oil. The coconut oil helps the chocolate melt smoothly and gives it a lovely sheen. Stir the chocolate gently until it’s completely smooth and glossy. Once melted, pour this glorious dark chocolate over the pressed nut mixture in the baking dish. Using your spatula, spread the chocolate evenly to cover the entire surface. This chocolate layer is not just for decoration; it acts as a delicious, decadent binder and topping for your bars.
Step 5: Setting and Finishing Touches
Now, we need to let our creations set. Carefully place the baking dish in the refrigerator for at least 2-3 hours, or until the chocolate is completely firm. This chilling time is essential for the bars to solidify properly. Once the chocolate is firm, lift the entire slab out of the baking dish using the parchment paper. Place it on a cutting board. If you’re using the optional flaky salt, now is the time to sprinkle it over the top of the set chocolate. The little bursts of saltiness against the dark chocolate and nuts are absolutely divine. Using a sharp knife, cut the slab into your desired bar shapes. I usually get about 12-16 bars, depending on how thick I slice them. Store your finished Dark Chocolate and Sea Salt Nut Bars in an airtight container in the refrigerator. They’ll stay fresh for up to a week, though I doubt they’ll last that long! Enjoy these delightful, homemade treasures.
Conclusion:
These Dark Chocolate and Sea Salt Nut Bars are a truly fantastic treat, hitting all the right notes for a satisfying snack or dessert. The rich, slightly bitter dark chocolate perfectly complements the satisfying crunch of assorted nuts, all brought together with a delicate hint of sea salt that elevates every bite. They are remarkably easy to make, proving that gourmet-tasting bars don’t require a lot of fuss. Whether you’re looking for a healthy-ish indulgence, a portable energy boost, or a delightful homemade gift, these bars are sure to impress.
I love enjoying these bars with a cup of coffee in the morning for a little pick-me-up, or as an after-dinner indulgence to satisfy my sweet tooth. They also make for a wonderful addition to a cheese board or a packed lunchbox.
Don’t hesitate to experiment! Try adding dried cranberries for a tart counterpoint, or a sprinkle of chili flakes for a surprising kick. Different nuts can also create unique flavor profiles – think pistachios, almonds, or even macadamia nuts.
I truly encourage you to give this Dark Chocolate and Sea Salt Nut Bar recipe a try. I’m confident you’ll find them as addictive and enjoyable as I do!
Frequently Asked Questions:
Can I make these bars vegan?
Absolutely! Simply ensure you use dairy-free dark chocolate (most good quality dark chocolate is naturally vegan, but always check the ingredients). You’ll also want to substitute any honey with a vegan liquid sweetener like maple syrup or agave nectar.
How should I store these bars?
Store your Dark Chocolate and Sea Salt Nut Bars in an airtight container at room temperature for up to a week. For longer storage, they can be kept in the refrigerator, although the chocolate may harden a bit more.
What kind of nuts work best?
A mix of nuts is ideal for texture and flavor. Almonds, walnuts, pecans, and cashews are all excellent choices. You can also include seeds like pumpkin seeds or sunflower seeds for added nutrition and crunch.
Dark Chocolate and Sea Salt Nut Bars
Easy no-bake bars featuring a mix of nuts, puffed rice, and a dark chocolate drizzle, finished with sea salt.
Ingredients
-
2 1/2 cups unsalted nuts (3/4 cup cashews, 3/4 cup peanuts, 1 cup almonds)
-
1/2 cup puffed rice
-
1/4 cup brown rice syrup
-
1 1/2 teaspoon vanilla extract
-
1/2 teaspoon sea salt
-
1 cup dark chocolate chips
-
2 teaspoons coconut oil
-
Flaky salt for topping (optional)
Instructions
-
Step 1
Line an 8×8 inch baking pan with parchment paper, leaving an overhang on the sides. -
Step 2
In a large bowl, combine the chopped nuts and puffed rice. -
Step 3
In a small saucepan over low heat, gently warm the brown rice syrup, vanilla extract, and sea salt until combined. Do not boil. -
Step 4
Pour the warm syrup mixture over the nut and rice mixture. Stir well to coat everything evenly. -
Step 5
Press the mixture firmly and evenly into the prepared baking pan. -
Step 6
In a microwave-safe bowl, combine dark chocolate chips and coconut oil. Microwave in 30-second intervals, stirring between each, until melted and smooth. -
Step 7
Drizzle the melted chocolate over the pressed nut mixture. Sprinkle with flaky salt, if desired. -
Step 8
Refrigerate for at least 1 hour, or until firm. Lift the bars out of the pan using the parchment paper overhang and cut into desired bar shapes.
Important Information
Nutrition Facts (Per Serving)
It is important to consider this information as approximate and not to use it as definitive health advice.
Allergy Information
Please check ingredients for potential allergens and consult a health professional if in doubt.