Crispy Hash Browns Recipe-Perfectly Golden & Delicious
Crispy hash browns are a breakfast superhero. There’s something undeniably magical about that perfect bite – the shatteringly crisp exterior giving way to a fluffy, savory interior. It’s no wonder so many of us crave them, whether it’s the star of our weekend brunch or a comforting accompaniment to a diner-style breakfast. What truly elevates these humble potatoes from merely good to utterly irresistible is that golden-brown crunch, the kind that sings with every forkful. They’re more than just a side dish; they’re an experience, a golden promise of a delicious start to the day. This recipe isn’t about complicated techniques; it’s about unlocking the secret to achieving that coveted crispy hash browns perfection in your own kitchen, time and time again.
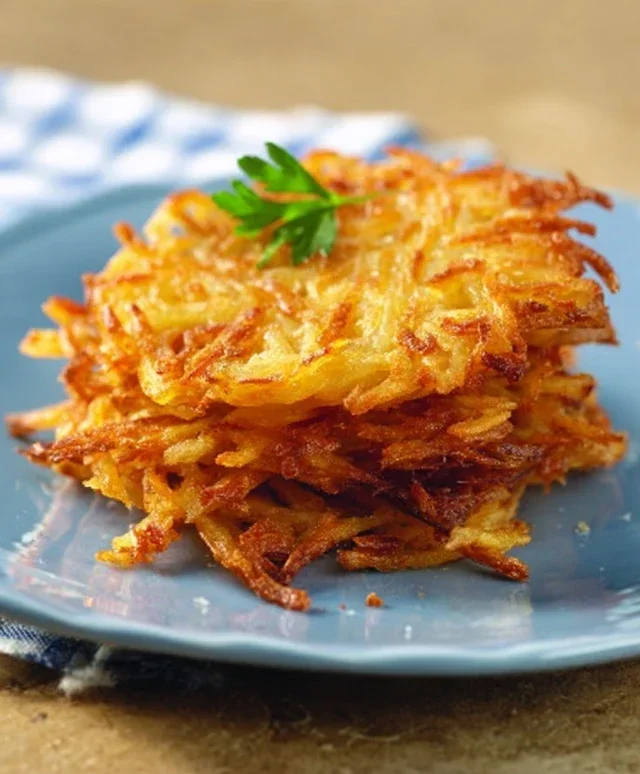
Crispy Hash Browns
There’s something undeniably comforting and utterly delicious about a plate of perfectly crispy hash browns. Whether it’s part of a hearty breakfast feast or a satisfying brunch, these golden-brown delights are a true crowd-pleaser. Forget those greasy, soggy versions you might have encountered; today, we’re going to unlock the secrets to achieving that irresistible crunch every single time. It all comes down to a few key techniques and a little bit of patience. So, grab your apron, and let’s get ready to make the best hash browns you’ve ever had!
Ingredients:
Cooking Instructions
Let’s get started on this journey to crispy perfection! The foundation of great hash browns lies in the potatoes themselves. We’ll be using russet potatoes, also known as Idaho potatoes, because their high starch content and dry flesh contribute beautifully to a crispy texture. Avoid waxy potatoes like Yukon Golds or red potatoes, as they tend to become mushy when grated and cooked.
1. Preparing the Potatoes: The Foundation of Crispiness
The first crucial step is to prepare our potatoes. You’ll want to start by washing them thoroughly. For hash browns, I usually opt to leave the skins on. This adds a lovely rustic texture and extra flavor, but if you prefer to peel them, that’s perfectly fine too. The most important part here is how we’re going to grate them. You have two main options: a box grater or a food processor. If using a box grater, opt for the large holes – the ones you’d typically use for shredding cheese. If you’re using a food processor, fit it with the shredding disc. Grate all three potatoes into a large bowl. Once grated, immediately add your teaspoon of salt and half a teaspoon of pepper. The salt will begin extract to draw out moisture from the potatoes, which is essential for achieving that crispiness later.
2. Rinsing and Squeezing: The Moisture-Removal Masterclass
This next step is arguably the most critical for achieving that coveted crisp. After salting, you’ll notice that the grated potatoes are releasing quite a bit of liquid. We need to get as much of this moisture out as possible. Place the grated potatoes into a fine-mesh sieve and rinse them thoroughly under cold running water. This rinsing not only helps remove excess starch but also further washes away some of the salt you just added, preventing the final hash browns from being overly salty. Now, for the real magic: squeezing. This is where you’ll need some serious elbow grease. Take a generous handful of the rinsed, grated potatoes and squeeze them as hard as you possibly can over the sink or a bowl. You’ll be amazed at how much water comes out! Repeat this process, working in batches, until you’ve squeezed out as much liquid as humanly possible from all the grated potatoes. You can even place the squeezed potato shreds in a clean kitchen towel or cheesecloth and twist it tightly to wring out even more moisture. The drier the potatoes, the crispier they will become.
3. Seasoning and Optional Additions: Flavor Infusion
Once your potatoes are as dry as you can get them, it’s time for a final seasoning adjustment. Taste a tiny bit of the squeezed potato shreds. If they seem a bit bland, add a touch more salt and pepper, mixing it in thoroughly. This is also the point where you can incorporate any optional additions. If you’re a fan of a little oniony bite, now’s the time to stir in your finely chopped onion or chives. Make sure to distribute them evenly throughout the potato mixture. These little additions can elevate your hash browns from good to truly spectacular, adding subtle layers of flavor.
4. The Sizzle: Getting That Perfect Golden-Brown Crust
Now for the cooking! Heat your neutral cooking oil in a large, heavy-bottomed skillet (cast iron is ideal here if you have one) over medium-high heat. You want enough oil to generously coat the bottom of the pan, about 2-4 tablespoons. Let the oil get nice and hot – you should see a slight shimmer on its surface. Carefully add the seasoned potato mixture to the hot skillet, spreading it out evenly into a single layer. Don’t overcrowd the pan; if necessary, cook in batches. Overcrowding will steam the potatoes instead of crisping them. Use a spatula to gently press down on the potato mixture to form a compact, even layer. Resist the urge to stir or move the hash browns for at least 4-5 minutes. This allows a beautiful, golden-brown crust to form on the bottom.
5. Flipping and Achieving Ultimate Crispiness: Patience is a Virtue
After 4-5 minutes of undisturbed cooking, it’s time to check for that golden crust. Carefully slide your spatula underneath a section of the hash browns. If it lifts easily and is a rich golden-brown, it’s ready to flip. If it sticks or is still pnon-alcoholic ale, give it another minute or two. When you flip, try to flip in large sections rather than individual shreds to maintain some structural integrity. Cook the other side for another 4-5 minutes, again, resisting the urge to fiddle with them too much. The key to ultimate crispiness is allowing each side to develop a substantial crust. If you want them even crispier, you can reduce the heat slightly to medium after the initial sizzle, cover the pan loosely (allowing steam to escape), and let them cook for a few more minutes. This allows the inside to cook through while the exterior continues to crisp up. Once they’re beautifully golden-brown and wonderfully crisp on both sides, remove them from the skillet with a slotted spatula to drain any excess oil. Season with a final pinch of salt and pepper, if desired, and serve immediately. Enjoy your perfectly crispy hash browns!

Conclusion:
I hope you’re as excited as I am to whip up a batch of these absolutely delicious Crispy Hash Browns! This recipe is a true winner because it delivers that satisfying crunch on the outside and a fluffy, tender potato interior that’s simply divine. It’s remarkably straightforward, making it perfect for both begin extractner cooks and seasoned chefs looking for a reliable, crowd-pleasing breakfast or brunch staple. The beauty of these hash browns lies in their versatility; they’re a fantastic base for a variety of toppings. Imagin extracte them piled high with a perfectly fried egg, crispy beef bacon, and a dollop of sour cream, or perhaps topped with avocado and a sprinkle of chili flakes for a zesty twist.
Don’t be afraid to experiment with variations! You can easily incorporate finely chopped onions, bell peppers, or even a sprinkle of your favorite cheese into the potato mixture before frying for an added layer of flavor. Feel free to experiment with different cooking fats too, like beef bacon grease for an extra savory note, or even a blend of butter and oil for a rich taste. I truly encourage you to give this recipe a try; I’m confident you’ll be making these Crispy Hash Browns a regular part of your breakfast repertoire. They are truly a game-changer!
Frequently Asked Questions:
Q1: My hash browns aren’t getting crispy enough. What am I doing wrong?
Ensuring your hash browns are truly crispy often comes down to a few key factors. First, make sure your skillet is hot enough before adding the potatoes; a medium-high heat is ideal. Second, don’t overcrowd the pan! This will steam the potatoes instead of crisping them. Cook in batches if necessary. Lastly, ensure you’ve thoroughly dried your shredded potatoes after rinsing; excess moisture is the enemy of crispiness.
Q2: Can I prepare the shredded potatoes ahead of time?
Yes, you can! After shredding and rinsing your potatoes, be sure to dry them extremely well. You can store them in an airtight container in the refrigerator for up to 24 hours. It’s crucial to pat them dry one more time just before cooking to remove any condensation.
Crispy Hash Browns
Golden and crispy pan-fried hash browns, a perfect breakfast side.
Ingredients
-
4 large Russet potatoes, peeled
-
1 tablespoon bacon grease
-
1/2 teaspoon salt
-
1/4 teaspoon black pepper
-
1/4 cup finely chopped onion (optional)
-
1 tablespoon unsalted butter
Instructions
-
Step 1
Grate the peeled potatoes using a box grater or food processor. Place the grated potatoes in a clean kitchen towel or cheesecloth and squeeze out as much moisture as possible. This is crucial for crispiness. -
Step 2
In a bowl, toss the dried grated potatoes with salt, pepper, and chopped onion (if using). -
Step 3
Heat the bacon grease and unsalted butter in a large non-stick or cast-iron skillet over medium-high heat until shimmering. -
Step 4
Add the potato mixture to the hot skillet, spreading it evenly into a single layer. Press down gently with a spatula. -
Step 5
Cook for 5-7 minutes without disturbing, until the bottom is golden brown and crispy. -
Step 6
Flip the hash browns carefully using a spatula. Cook for another 5-7 minutes until the other side is also golden brown and crispy. -
Step 7
Serve immediately.
Important Information
Nutrition Facts (Per Serving)
It is important to consider this information as approximate and not to use it as definitive health advice.
Allergy Information
Please check ingredients for potential allergens and consult a health professional if in doubt.