Easy Homemade Strawberry Ice Cream Recipe
Homemade strawberry ice cream is a summer dream come true, a vibrant scoop of pure joy that whispers of sun-drenched fields and carefree days. There’s a reason why this classic treat holds such a special place in our hearts; its naturally sweet, slightly tart flavor is undeniably comforting and utterly irresistible. Forget those bland, artificial-tasting versions from the store. When you make homemade strawberry ice cream, you’re not just creating dessert; you’re crafting an experience. The magic lies in the simplicity of fresh, ripe strawberries, their juicy essence transforming into a creamy, dreamy delight that’s both refreshing and decadent. This isn’t just ice cream; it’s a tangible embodiment of summer’s bounty, a testament to how a few perfect ingredients can create something truly extraordinary. Get ready to experience the unparalleled pleasure of your own homemade strawberry ice cream.
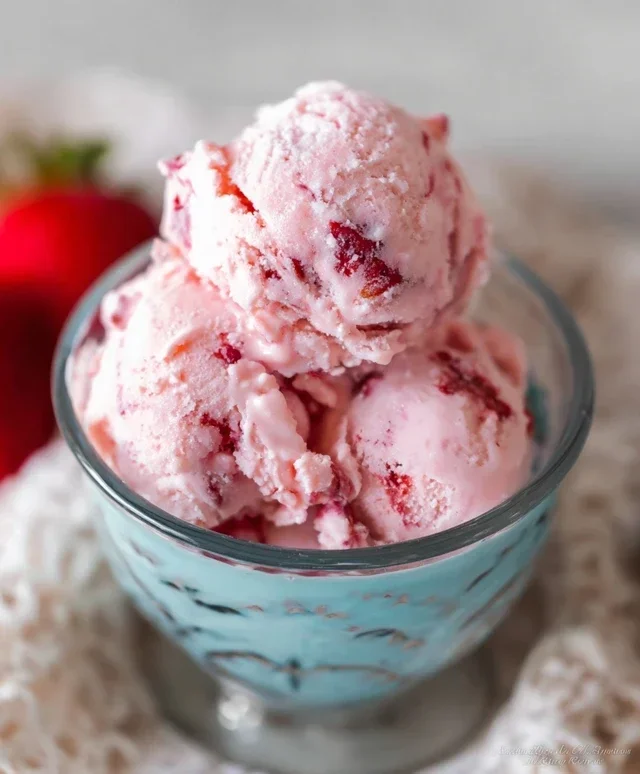
Homemade Strawberry Ice Cream
There’s something incredibly special about homemade ice cream. The vibrant flavor of fresh strawberries, bursting with sweetness and a hint of tartness, transforms into a creamy, dreamy dessert that simply can’t be replicated by anything store-bought. This recipe for Homemade Strawberry Ice Cream is designed to be straightforward, yielding a truly delightful treat that will impress your friends and family, or simply be a wonderful indulgence for yourself. Forget the artificial flavors and stabilizers; we’re going back to basics with pure, delicious ingredients.
Ingredients:
Instructions:
1. Prepare the Strawberry Puree: Begin extract by taking your beautifully ripe strawberries. Hulled means removing the leafy green tops, and then dice them into manageable pieces. The smaller the pieces, the easier they will be to blend. Place these diced strawberries into a food processor or a blender. Add the 2 tablespoons of honey, which will enhance the natural sweetness of the strawberries and provide a lovely depth of flavor. Also, add the 1 teaspoon of lemon juice. The lemon juice is a secret weapon here; it doesn’t make the ice cream taste lemony, but rather brightens the strawberry flavor and balances the sweetness, preventing it from becoming cloying. Pulse or blend until you have a smooth, vibrant puree. You want it to be free of large chunks, but a little texture is perfectly fine if you prefer.
2. Sweeten and Infuse the Base: Once you have your smooth strawberry puree, it’s time to build the ice cream base. In a separate bowl, combine the 1/2 cup of granulated sugar with the heavy whipping cream and the half and half. Add the 1 teaspoon of vanilla extract. Vanilla is essential for rounding out the flavors and complementing the strawberries. Whisk these ingredients together until the sugar is mostly dissolved. Don’t worry if it’s not perfectly dissolved at this stage; it will fully incorporate as the mixture chills. You can gently warm the cream and half and half mixture over low heat if you’re in a hurry to dissolve the sugar, but be very careful not to let it boil. Simply warm it enough to make the sugar disappear.
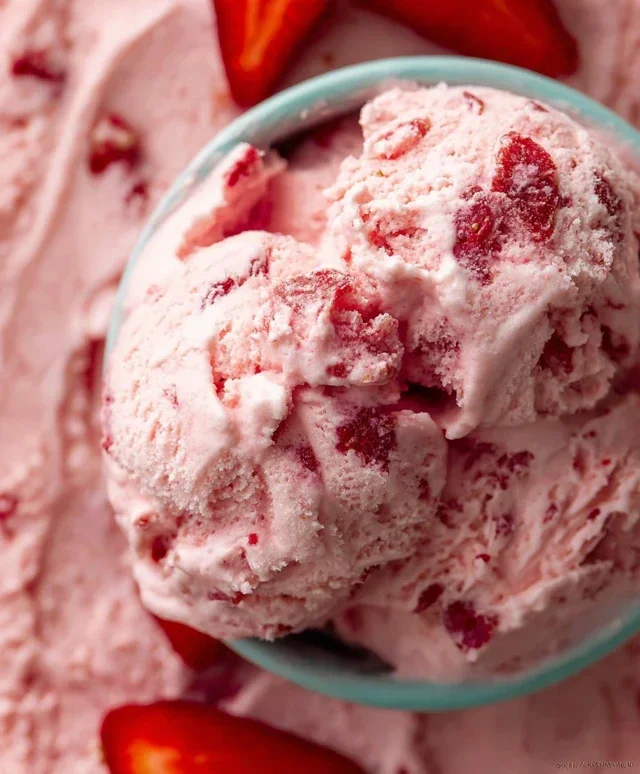
3. Combine and Chill: Now, it’s time to bring our components together. Pour the strawberry puree into the cream mixture. Whisk everything together thoroughly until it’s uniformly pink and well combined. The color should be a beautiful, natural shade of strawberry pink. The next crucial step for achieving the creamiest ice cream is chilling the base. Cover the bowl tightly with plastic wrap, ensuring the wrap touches the surface of the mixture to prevent a skin from forming. Refrigerate this mixture for at least 4 hours, or preferably overnight. The longer it chills, the colder and more homogenous it will become, which directly translates to a smoother ice cream texture when churned. This chilling period allows the flavors to meld and the fat in the cream to solidify slightly, which is vital for optimal churning.
4. Churn the Ice Cream: Once your base is thoroughly chilled, it’s time to churn it. If you have an ice cream maker, follow the manufacturer’s instructions for your specific model. Generally, you will pour the chilled ice cream base into the pre-frozen bowl of your ice cream maker and let it churn for about 20-30 minutes, or until it reaches a soft-serve consistency. The churning process incorporates air into the mixture and breaks down ice crystals, which is what gives ice cream its signature creamy texture. Resist the urge to over-churn, as this can lead to a more icy result. If you don’t have an ice cream maker, you can still achieve a delicious result using a freezer-safe container and a bit more manual effort.
5. Freeze and Harden: After churning, the ice cream will be soft and scoopable, but it won’t be firm enough to hold its shape like traditional ice cream. Transfer the churned ice cream into a freezer-safe container. Press a piece of parchment paper or plastic wrap directly onto the surface of the ice cream to prevent ice crystals from forming on top. Seal the container tightly. Place the container in the freezer for at least 4-6 hours, or until it’s firm enough to scoop. The longer it freezes, the harder it will become. For the absolute best texture, allow it to freeze for at least 8 hours. When you’re ready to serve, let the ice cream sit at room temperature for about 5-10 minutes to soften slightly, making it easier to scoop and enjoy.
This homemade strawberry ice cream is a testament to the power of simple, quality ingredients. The sweet, slightly tart burst of fresh strawberries, complemented by the richness of cream, creates a flavor profile that’s simply irresistible. Enjoy every creamy, dreamy spoonful!
Conclusion:
There you have it – your guide to creating the most delightful homemade strawberry ice cream! This recipe is truly fantastic because it uses fresh, vibrant strawberries, allowing their natural sweetness and slightly tart flavor to shine through. The creamy texture, achieved with simple ingredients, is a testament to the beauty of making ice cream from scratch. It’s a rewarding process that results in a treat far superior to anything store-bought. Imagin extracte the satisfaction of scooping up a generous portion of this luscious, homemade goodness!
Serving this homemade strawberry ice cream is a joy. It’s perfect on its own, but it also pairs wonderfully with warm brownies, a slice of pound cake, or even a drizzle of balsamic glaze for a sophisticated twist. Don’t be afraid to get creative with variations! You could fold in some fresh mint for a refreshing burst, swirl in some chocolate or lemon curd, or even add a splash of Grand Marnier Extract for an adult-friendly indulgence. I truly encourage you to give this recipe a try; I promise you won’t regret the delicious results!
Frequently Asked Questions:
Q: Can I make this homemade strawberry ice cream without an ice cream maker?
Absolutely! If you don’t have an ice cream maker, you can still achieve a lovely texture. Pour the base mixture into a freezer-safe container. Every 30-45 minutes for the first 3-4 hours, stir the mixture vigorously with a fork or whisk to break up ice crystals. This manual churning process will help create a smoother, creamier consistency.
Q: How long does homemade strawberry ice cream last?
Homemade strawberry ice cream is best enjoyed within 1-2 weeks for optimal freshness and texture. Store it in an airtight container in the coldest part of your freezer. Over time, ice crystals can form, which may affect the texture, so consuming it sooner rather than later is ideal.
Q: My strawberries aren’t very sweet. How can I adjust the sweetness?
If your strawberries are on the tarter side, you can easily adjust the sugar. Taste the strawberry puree before adding it to the cream base. You can increase the sugar in the base by a tablespoon or two, or even add a touch of simple syrup to the finished ice cream if it needs a little more sweetness. Remember, you can always add more, but you can’t take it away!
Homemade Strawberry Ice Cream
A simple and delicious homemade strawberry ice cream recipe, perfect for a sweet treat.
Ingredients
-
1 1/2 cups strawberries, hulled and diced
-
2 Tbsp honey
-
1/2 cup granulated sugar
-
1 tsp lemon juice
-
1 cup heavy whipping cream
-
1/2 cup half and half
-
1 tsp vanilla extract
Instructions
-
Step 1
In a bowl, combine the diced strawberries, honey, granulated sugar, and lemon juice. Let sit for 10-15 minutes to allow the strawberries to macerate. -
Step 2
Puree the strawberry mixture using an immersion blender or a regular blender until smooth. -
Step 3
In a separate bowl, whisk together the heavy whipping cream, half and half, and vanilla extract until well combined. -
Step 4
Gently fold the pureed strawberry mixture into the cream mixture. -
Step 5
Pour the mixture into an ice cream maker and churn according to the manufacturer’s instructions until it reaches a soft-serve consistency. -
Step 6
Transfer the ice cream to an airtight container and freeze for at least 2-4 hours, or until firm.
Important Information
Nutrition Facts (Per Serving)
It is important to consider this information as approximate and not to use it as definitive health advice.
Allergy Information
Please check ingredients for potential allergens and consult a health professional if in doubt.