Red White Blue Cheesecake Strawberries Easy Recipe
Red, White, and Blue Cheesecake Strawberries are more than just a dessert; they’re a vibrant celebration on a plate! Imagin extracte the burst of sweet strawberry, the creamy tang of cheesecake, and a hint of patriotic spirit all rolled into one irresistible bite. It’s no wonder this delightful treat has captured hearts everywhere. We love them because they offer a sophisticated yet incredibly easy way to impress guests or simply treat ourselves to something truly special. What makes these Red, White, and Blue Cheesecake Strawberries so magical is their effortless elegance. They’re the perfect accompaniment to summer picnics, barbecues, or any occasion where a touch of festive flair is desired. Get ready to fall in love with this simple yet spectacular recipe!
Why You’ll Adore This Recipe
A Patriotic Masterpiece
This isn’t your average dessert. The combination of fresh, juicy strawberries, a velvety smooth cheesecake filling, and a sprinkle of patriotic color makes these Red, White, and Blue Cheesecake Strawberries a showstopper. They’re visually stunning and incredibly delicious, offering a delightful balance of textures and flavors that will leave everyone asking for seconds.
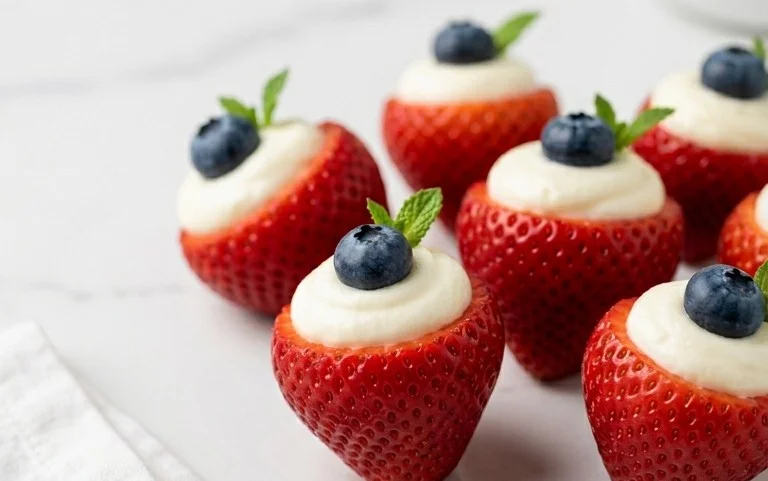
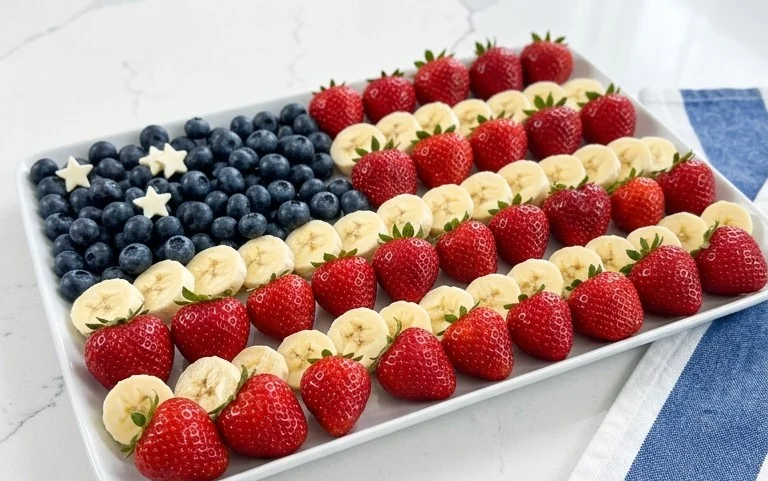
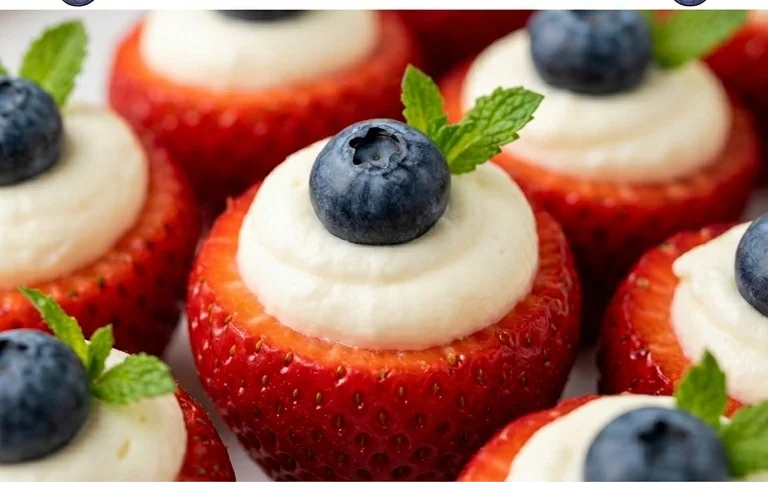
Red, White, and Blue Cheesecake Strawberries
Get ready for a dessert that’s as stunning as it is delicious! These Red, White, and Blue Cheesecake Strawberries are the perfect patriotic treat for any celebration, from Fourth of July barbecues to Memorial Day picnics, or even just a fun summer dessert. They’re incredibly easy to make, requiring no baking, and the combination of creamy cheesecake filling, sweet strawberries, and juicy blueberries is simply irresistible. The vibrant colors make them a real showstopper, and I promise, your guests will be beggin extractg for the recipe!
These little bites are a delightful twist on traditional cheesecake, offering all the rich, tangy flavor without the fuss of a water bath or a long baking time. We’re essentially creating a no-bake cheesecake filling that we’ll lovingly spoon into juicy strawberry halves, then crown with a scattering of vibrant blueberries. It’s a simple assembly process that yields impressive results, making it an ideal recipe for bakers of all skill levels, including begin extractners. The beauty of this dessert lies in its simplicity and the fresh, bright flavors that come together so harmoniously.
Ingredients:
Preparation and Assembly
This recipe is all about creating a smooth, luscious cheesecake filling and then artfully combining it with our fresh fruit. The key to a perfectly smooth filling is ensuring your cream cheese is truly softened. If it’s still cold, it can lead to a lumpy texture, and we want that velvety consistency. Similarly, make sure your whipped topping is fully thawed but not deflated.
Step 1: Prepare the Cream Cheese Mixture
In a medium mixing bowl, begin extract by combining the softened cream cheese and the confectioners’ sugar. You can use a hand mixer or a sturdy whisk for this step. It’s important to beat these two ingredients together until they are completely smooth and well combined. Scrape down the sides of the bowl a few times to ensure no pockets of cream cheese or sugar remain unmixed. This initial step is crucial for the texture of our cheesecake filling. We’re aiming for a light and airy base before we introduce the other components. Don’t rush this part; a thoroughly mixed cream cheese and sugar mixture will form the foundation of our creamy delight.
Step 2: Incorporate the Whipped Topping and Almond Extract
Once the cream cheese and confectioners’ sugar are perfectly smooth, it’s time to gently fold in the thawed whipped topping. Use a spatula for this to avoid deflating the airy texture of the whipped topping. Fold it in just until it’s incorporated. Overmixing at this stage can cause the filling to become too dense. Next, add the almond extract. This extract adds a subtle, sophisticated flavor that complements the sweetness of the filling and the tartness of the strawberries beautifully. If you’re not a fan of almond extract, you can substitute it with a touch of vanilla extract, but I find the almond offers a unique depth. Stir it in gently until it’s evenly distributed throughout the filling.
Step 3: Prepare the Strawberry Halves
While your filling is resting, it’s time to get your strawberries ready. Wash them thoroughly and pat them completely dry with paper towels. Any excess moisture can make the filling slide off. Carefully cut the large strawberries in half lengthwise. You want nice, sturdy halves that can hold a generous dollop of the cheesecake filling. You can trim off any thin, pointy ends if you prefer a more uniform look, but it’s not strictly necessary. The goal is to create little edible boats for our delicious filling.
Step 4: Fill the Strawberries
Now for the fun part! Take a small spoon or a piping bag fitted with a round tip (if you want to be extra fancy, though a spoon works perfectly fine). Gently spoon or pipe a good amount of the cheesecake filling into the hollowed-out part of each strawberry half. Don’t be shy! You want a nice, heaping spoonful to create that classic cheesecake experience. Aim for a smooth, rounded top to the filling, as this will be the “white” part of our patriotic design. Ensure the filling sits securely in the strawberry half.
Step 5: Decorate with Blueberries
The final touch! Carefully arrange three blueberries on top of the cheesecake filling on each strawberry half. You can place them in a little cluster or a line – get creative with your arrangement! The blueberries provide that beautiful “blue” element, completing the red, white, and blue theme. The contrast of the deep blue berries against the creamy white filling and the vibrant red strawberry is truly eye-catching. This step is where the magic happens visually, transforming simple strawberries into festive, bite-sized desserts.
Step 6: Chill and Serve
Once all your strawberries are filled and decorated, carefully arrange them on a serving platter. It’s best to chill these cheesecake-filled strawberries for at least 30 minutes before serving. This allows the filling to set up a bit more and ensures the flavors meld together beautifully. They are best enjoyed fresh, so I recommend making them on the day you plan to serve them. They are a delightful, light dessert that’s sure to be a hit at any gathering. Enjoy the burst of flavors and the festive look!
Conclusion:
There you have it – a delightful and surprisingly simple way to create beautiful Red, White, and Blue Cheesecake Strawberries! This recipe is a winner for so many reasons. It’s visually stunning, making it a perfect centerpiece for any patriotic celebration or summer gathering. The creamy, tangy cheesecake filling perfectly complements the sweetness of fresh strawberries, offering a burst of flavor with every bite. Plus, the no-bake aspect means less time in the kitchen and more time enjoying your guests and the delicious outcome. They are a fantastic alternative to a heavy, traditional cheesecake and are inherently portion-controlled.
When it comes to serving, these are delightful on their own, but consider arrangin extractg them on a festive platter. They also make a lovely addition to a dessert buffet or alongside a light summer meal. For variations, feel free to experiment with different extracts in your cheesecake filling, like almond or lemon, for a subtle twist. You could also try drizzling them with white chocolate for an extra touch of decadence. I truly encourage you to give these Red, White, and Blue Cheesecake Strawberries a try – they are sure to impress!
Frequently Asked Questions:
Can I make these cheesecake strawberries ahead of time?
Yes, absolutely! These can be prepared a day in advance and stored in an airtight container in the refrigerator. This makes them a perfect make-ahead dessert for parties.
What if I don’t have fresh strawberries?
While fresh strawberries are ideal for their bright flavor and texture, you could potentially use thawed, drained frozen strawberries for the red layer if absolutely necessary. However, the texture might be a bit softer. For the white and blue layers, fresh is best.
How should I store any leftovers?
Leftover Red, White, and Blue Cheesecake Strawberries should be stored in an airtight container in the refrigerator. They are best consumed within 1-2 days for optimal freshness and texture.
Red, White, and Blue Cheesecake Strawberries
A festive and easy no-bake dessert featuring cream cheese filling and fresh berries, perfect for patriotic holidays.
Ingredients
-
1 (8-ounce) package cream cheese, softened
-
1/2 cup confectioners’ sugar
-
1 cup whipped topping, thawed
-
1/2 teaspoon almond extract
-
12 large strawberries, cut in half
-
36 blueberries
Instructions
-
Step 1
In a medium bowl, beat the softened cream cheese and confectioners’ sugar until smooth. -
Step 2
Gently fold in the thawed whipped topping and almond extract until just combined. -
Step 3
Spoon or pipe the cream cheese mixture onto the cut side of the halved strawberries. -
Step 4
Arrange the stuffed strawberries on a serving platter. -
Step 5
Top each strawberry with a few blueberries to create the red, white, and blue effect. -
Step 6
Chill for at least 30 minutes before serving.
Important Information
Nutrition Facts (Per Serving)
It is important to consider this information as approximate and not to use it as definitive health advice.
Allergy Information
Please check ingredients for potential allergens and consult a health professional if in doubt.