Easy 4th of July Trifle Recipe Red White Blue Dessert
The 4th of July Trifle is more than just a dessert; it’s a vibrant, show-stopping centerpiece that embodies the spirit of celebration. As soon as those iconic red, white, and blue layers appear, you know the party has truly begun. We all love a good 4th of July Trifle because it’s incredibly versatile, visually stunning, and delightfully easy to assemble, making it perfect for any gathering, from backyard barbecues to grand fireworks-viewing parties. What makes this particular 4th of July Trifle so special is its perfect balance of textures and flavors – creamy mascarpone, tender cake, and a burst of fresh berries, all coming together in a symphony of deliciousness. It’s the ultimate crowd-pleaser, guaranteed to leave everyone asking for the recipe. Get ready to impress your guests with this patriotic masterpiece!
4th of July Trifle
This 4th of July Trifle is a showstopper! It’s a beautiful, patriotic dessert that’s surprisingly easy to make, perfect for any Independence Day celebration. The layers of fluffy white chocolate pudding, tender angel food cake, and vibrant fresh berries create a delightful texture and flavor combination that everyone will love. Plus, its red, white, and blue presentation makes it an instant hit for any festive occasion. Let’s get started on this easy and impressive dessert!
Ingredients:
Preparing the Pudding Layer
This is where the creamy white base of our trifle comes to life. Using instant pudding makes this dessert incredibly quick and requires no actual cooking.
Step 1: Mix the Pudding
In a large bowl, combine the instant white chocolate pudding mix with the cold whole milk. It’s crucial to use cold milk for the pudding to set properly and achieve the best texture. Whisk the mixture vigorously for about 2 minutes, or until it’s smooth and begin extracts to thicken. Don’t be tempted to stop too early; a good whisking ensures no lumps remain and that the pudding will set up beautifully. Cover the bowl tightly with plastic wrap, pressing the wrap directly onto the surface of the pudding. This prevents a skin from forming. Refrigerate the pudding for at least 4 hours, or preferably overnight, until it is completely chilled and firm. The longer it chills, the firmer it will get, making it easier to layer.
Assembling the Trifle Layers
Now for the fun part – building our magnificent trifle! A clear trifle dish or a large glass bowl is ideal for showcasing the beautiful layers.
Step 2: Prepare the Cake and Fruit
While the pudding is chilling, you can prepare your other components. Take your store-bought angel food cake and gently cut it into roughly 1-inch cubes. Angel food cake is very delicate, so handle it with care to avoid crushing it too much. You want distinct pieces that will absorb some of the pudding and fruit juices. Wash your strawberries thoroughly, remove the stems, and then slice them. It’s important to pat the sliced strawberries dry with paper towels. Excess moisture can make the trifle watery. Similarly, wash and dry your fresh blueberries. Having all these components ready makes the assembly process smooth and efficient.
Step 3: Create the First Cake Layer
Begin extract by placing half of the angel food cake cubes in an even layer at the bottom of your trifle dish. Gently press them down slightly so they form a cohesive base. Don’t worry if there are small gaps; the pudding and fruit will fill them.
Step 4: Add the First Pudding and Berry Layers
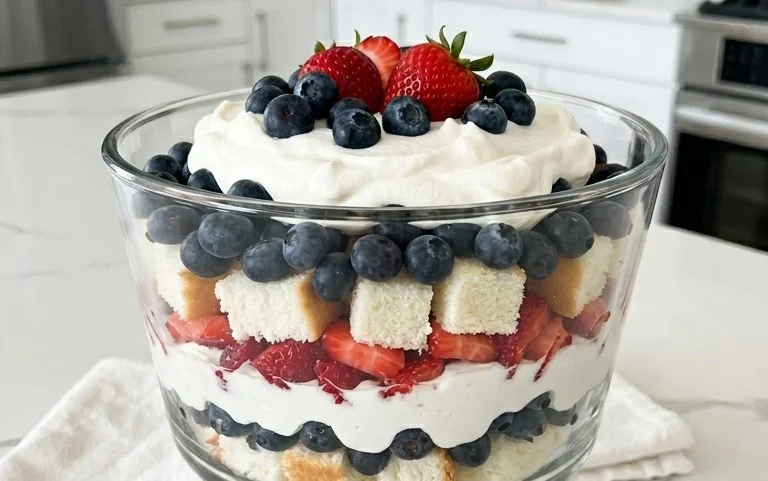
Once your pudding is firmly set, spread half of the chilled white chocolate pudding evenly over the layer of angel food cake. Next, sprinkle about half of your sliced strawberries over the pudding layer. Then, sprinkle about half of your fresh blueberries over the strawberries. Aim for an even distribution of fruit for both visual appeal and consistent flavor in every bite. The red and blue berries against the white pudding are already starting to create that festive Fourth of July look!
Step 5: Repeat the Layers
Now, repeat the layering process. Add the remaining half of the angel food cake cubes over the first berry layer. Gently press them down again. Top this with the remaining half of the white chocolate pudding, spreading it smoothly to cover the cake. Finally, arrange the remaining sliced strawberries and blueberries artfully on top of the pudding. You can create a patriotic pattern, like alternating red and blue stripes or a starburst design, to really make it pop for the holiday.
Finishing Touches and Serving
Step 6: The Whipped Topping and Final Decoration
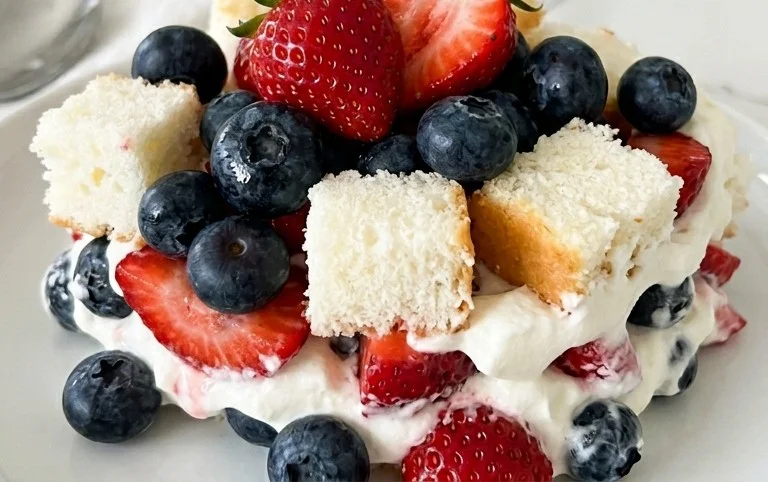
The final layer of fluffy whipped topping is what truly completes this dessert. Gently spread the thawed whipped topping over the berry and pudding layers, covering everything completely. You can use a spatula to create soft swirls and peaks, which adds a beautiful, cloud-like finish. For an extra festive touch, you can reserve a few extra blueberries and strawberries to place on top of the whipped cream, perhaps arranged in a star shape or alternating red and blue dots. Refrigerate the assembled trifle for at least 1 hour before serving. This allows the flavors to meld together and ensures the entire trifle is nicely chilled.
This 4th of July Trifle is best served cold. The combination of the light cake, creamy pudding, sweet berries, and airy whipped topping is incredibly refreshing, especially on a warm summer day. It’s a dessert that tastes as good as it looks, and it’s sure to be a memorable addition to your holiday spread. Enjoy!
Conclusion:
And there you have it – your ultimate guide to creating a show-stopping 4th of July Trifle! This layered dessert is more than just a treat; it’s a vibrant celebration in a dish, bursting with classic berry flavors and creamy goodness. Its visual appeal alone makes it a guaranteed crowd-pleaser, perfectly embodying the festive spirit of Independence Day. Whether you’re hosting a backyard barbecue, a potluck with friends, or simply want to add a touch of patriotic flair to your family gathering, this trifle is your secret weapon for a memorable dessert experience.
Don’t be afraid to get creative with your serving! This trifle looks stunning served in individual glasses or jars for a more personal touch, or you can assemble it in a large, clear trifle bowl to showcase those beautiful layers. For variations, consider adding a layer of lemon curd for a zesty kick, or swapping the angel food cake for pound cake for a richer texture. You could also experiment with different berry combinations like raspberries and blueberries, or even add a sprinkle of white chocolate chips for extra decadence. I truly encourage you to give this 4th of July Trifle a try – it’s incredibly forgiving and the results are always spectacular. Enjoy making your holiday even sweeter!
Frequently Asked Questions:
Can I make this trifle ahead of time?
Absolutely! In fact, making it a few hours or even the night before allows the flavors to meld beautifully and the cake to soften perfectly. Just keep it covered in the refrigerator until you’re ready to serve.
What if I don’t like angel food cake?
No problem! Pound cake, sponge cake, or even store-bought vanilla cupcakes cut into cubes work wonderfully as substitutes. The key is to have a cake that can absorb some of the moisture without becoming mushy.
Can I use frozen berries?
Yes, frozen berries are a fantastic and convenient option. Thaw them slightly and drain off any excess liquid before layering them with the whipped cream and cake to prevent the trifle from becoming watery.
4th of July Trifle
A festive and easy trifle layered with white chocolate pudding, angel food cake, whipped topping, strawberries, and blueberries, perfect for your Independence Day celebration.
Ingredients
-
6.8 ounces (two 3.4ounce) instant white chocolate pudding (Jello brand recommended)
-
4 cups cold whole milk
-
14 ounces store-bought angel food cake (cut into 1-inch cubes)
-
16 ounces (two 8-ounce) containers thawed whipped topping
-
32 ounces container fresh strawberries (washed, stems removed, sliced and pat dry)
-
18 ounces container fresh blueberries (washed and dried)
Instructions
-
Step 1
In a large bowl, whisk together the instant white chocolate pudding mix and cold whole milk according to pudding package directions (usually about 2 minutes). Let it set for 5 minutes to thicken. -
Step 2
In a large trifle dish or individual serving glasses, begin layering. Start with a layer of cubed angel food cake. -
Step 3
Spread a generous layer of the thickened white chocolate pudding over the cake cubes. -
Step 4
Add a layer of sliced strawberries over the pudding. -
Step 5
Top the strawberries with a layer of thawed whipped topping. -
Step 6
Repeat the layers: cake cubes, pudding, strawberries, and whipped topping. Finish with a final layer of whipped topping. -
Step 7
Garnish the top with fresh blueberries to create a patriotic design. Refrigerate for at least 30 minutes before serving to allow flavors to meld.
Important Information
Nutrition Facts (Per Serving)
It is important to consider this information as approximate and not to use it as definitive health advice.
Allergy Information
Please check ingredients for potential allergens and consult a health professional if in doubt.