Cherry Dr Pepper Grilled Chicken Recipe-Sweet & Smoky Flavor
Get ready to fire up the grill because today, we’re diving into the sensational flavors of Cherry Dr. Pepper Grilled Chicken! This isn’t just any grilled chicken; it’s a taste bud vacation waiting to happen. If you’re looking for a recipe that’s guaranteed to impress, something that balances sweet, savory, and a hint of that iconic Dr. Pepper tang, then you’ve found your match. People absolutely rave about this dish because it’s incredibly juicy, packed with flavor, and surprisingly easy to whip up, making it perfect for weeknight dinners or backyard barbecues. What truly sets this Cherry Dr. Pepper Grilled Chicken apart is the magical combination of a tangy, sweet glaze that caramelizes beautifully on the grill, infusing every bite with a delightful complexity you won’t soon forget. I can’t wait for you to try it!

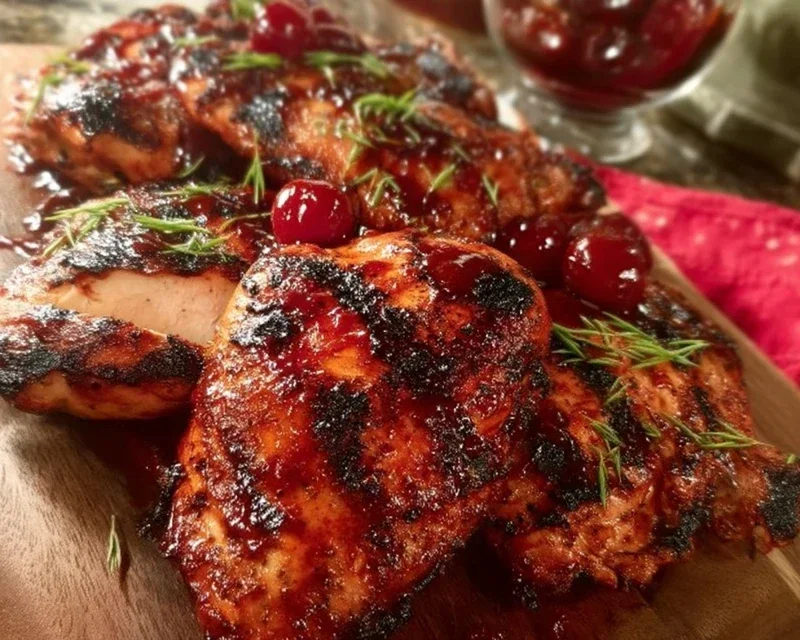
Cherry Dr. Pepper Grilled Chicken
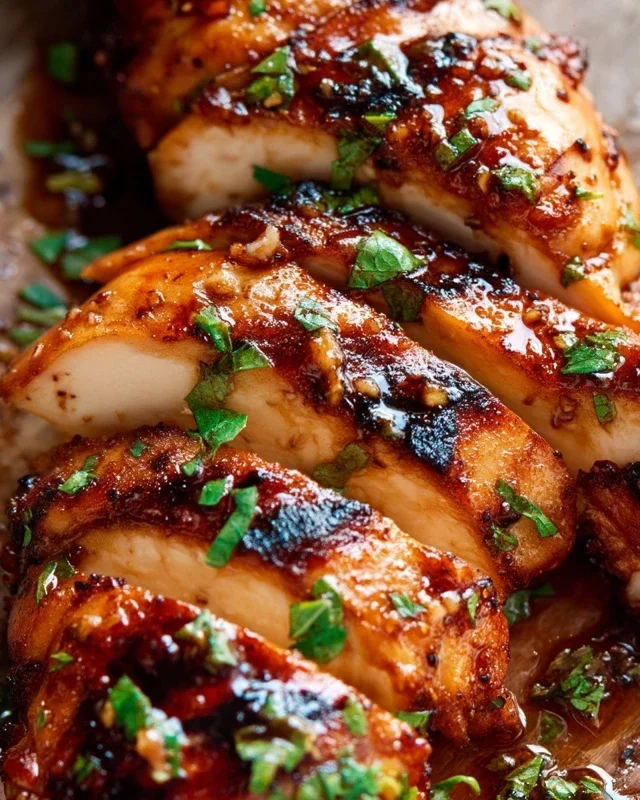
Get ready to tantalize your taste buds with a flavor explosion that’s both unexpected and incredibly delicious. This Cherry Dr. Pepper Grilled Chicken recipe transforms simple grilled chicken into a sweet, tangy, and slightly smoky masterpiece. The secret? A glaze crafted from the iconic Cherry Dr. Pepper, combined with classic barbecue staples. It’s the perfect dish for your next backyard barbecue, family dinner, or even a weeknight meal that feels like a special occasion. The sweet cherry notes of the soda beautifully complement the savory chicken, while the other ingredients create a rich and complex sauce that caramelizes perfectly on the grill.
Ingredients:
Crafting the Cherry Dr. Pepper Glaze
The heart of this recipe lies in its incredible glaze. It’s surprisingly simple to make and the combination of flavors is truly magical. You’ll want to prepare this at least 30 minutes before you plan to grill to allow the flavors to meld.
Grilling the Chicken
Now for the main event – getting that chicken perfectly grilled and coated in our amazing glaze.
Step-by-Step Cooking Instructions:
Prepare the Glaze: In a medium saucepan, combine the 12 oz can of Cherry Dr. Pepper, 1 cup of ketchup, 1 – 6 oz can of tomato paste, 1 cup of brown sugar, 1 tablespoon of Worcestershire sauce, 1/2 teaspoon of onion powder, 1/2 teaspoon of black pepper, 1/2 teaspoon of liquid smoke, 1/2 teaspoon of chili powder, and 1 teaspoon of minced garlic. Whisk everything together until well combined. Place the saucepan over medium heat and bring the mixture to a gentle simmer. Let it simmer for about 10-15 minutes, stirring occasionally, until it thickens slightly. The goal here is to reduce the liquid and concentrate the flavors, creating a syrupy consistency that will cling beautifully to the chicken. Taste and adjust seasonings if needed – you might want a pinch more salt or a touch more sugar depending on your preference. Once thickened, remove the glaze from the heat and set aside to cool slightly. You will be using this glaze both during the grilling process and as a finishing sauce.
Season the Chicken: While the glaze is simmering, it’s time to get your chicken ready. Pat your chicken pieces thoroughly dry with paper towels. This is a crucial step for achieving crispy skin and allowing the seasonings to adhere properly. In a small bowl, mix together the 3 teaspoons of seasoning salt and 1 teaspoon of paprika. Generously season all sides of your chicken pieces with this mixture, making sure to get into all the nooks and crannies. The seasoning salt provides a flavorful base, and the paprika adds a beautiful color and subtle smokiness. For extra flavor, you can also rub a little extra minced garlic and black pepper directly onto the chicken before applying the seasoning salt mixture.
Preheat and Prepare the Grill: Preheat your grill to medium-high heat. Whether you’re using a charcoal or gas grill, you want to ensure it’s hot enough to sear the chicken and develop those delicious grill marks, but not so hot that it burns the glaze too quickly. Clean your grill grates thoroughly with a wire brush to prevent sticking. You can also lightly oil your grates with a high-heat oil like canola or vegetable oil by dipping a folded paper towel in oil and using tongs to rub it across the hot grates. This is a vital step to ensure your chicken doesn’t become permanently fused to the grill.
Grill the Chicken and Glaze: Place the seasoned chicken pieces directly on the preheated grill grates. Grill for about 6-8 minutes per side, or until the chicken is starting to get golden brown and has developed nice grill marks. Now comes the fun part – applying the glaze! Using a pastry brush or a silicone brush, generously brush the Cherry Dr. Pepper glaze over all sides of the chicken. Be sure to coat it well. Continue to grill, turning and basting with more glaze every 5-7 minutes. The sugars in the glaze will caramelize, creating a beautiful, sticky, and incredibly flavorful coating. Grill for a total of about 20-25 minutes, or until the chicken is cooked through and reaches an internal temperature of 165°F (74°C) in the thickest part of the thigh, avoiding the bone. Keep an eye on the glaze, as the sugars can burn if the heat is too high or if it’s left on the grill for too long without turning. If you notice any areas browning too quickly, move those pieces to a cooler part of the grill.
Rest and Serve: Once the chicken is cooked to perfection, carefully remove it from the grill and place it on a clean platter or cutting board. Tent it loosely with foil and let it rest for 5-10 minutes. This resting period is essential for allowing the juices to redistribute throughout the meat, resulting in more tender and moist chicken. While the chicken is resting, you can spoon some of the extra glaze (that you reserved or made a double batch of) over the chicken. Serve your delicious Cherry Dr. Pepper Grilled Chicken hot, alongside your favorite barbecue sides like potato salad, coleslaw, or corn on the cob. Enjoy the sweet, smoky, and tangy goodness!
Conclusion:
There you have it – a recipe for Cherry Dr. Pepper Grilled Chicken that’s sure to become a summer staple! This dish is fantastic because the sweet and tangy cherry Dr. Pepper marinade tenderizes the chicken beautifully, creating an incredibly juicy and flavorful result. The subtle cola notes combined with the bright cherry essence make for a truly unique and memorable grilling experience that’s surprisingly easy to achieve. It’s the perfect balance of sweet, savory, and smoky, making it a crowd-pleaser for any occasion, from casual backyard BBQs to more festive gatherings.
I love serving this Cherry Dr. Pepper Grilled Chicken alongside classic BBQ sides like potato salad, corn on the cob, or a fresh green salad. It’s also delicious tucked into sliders or served over a bed of rice. Don’t be afraid to get creative with variations! You could add a pinch of cayenne pepper to the marinade for a touch of heat, or grill some pineapple slices alongside the chicken for an extra tropical twist. I truly hope you give this recipe a try – I’m confident you’ll be hooked!
Frequently Asked Questions:
Can I make this recipe indoors?
Absolutely! While grilling imparts that wonderful smoky flavor, you can achieve delicious results on an indoor grill pan or even by baking the chicken in the oven at 375°F (190°C) until cooked through, basting with the reserved marinade as it cooks. Just be sure to achieve a nice sear for texture.
How long should I marinate the chicken?
For optimal flavor and tenderness, I recommend marinating the chicken for at least 4 hours, or preferably overnight. This allows the Cherry Dr. Pepper marinade to fully penetrate the meat. Avoid marinating for much longer than 24 hours, as the acidity can start to break down the chicken too much.
Cherry Dr. Pepper Grilled Chicken
A sweet and savory grilled chicken recipe featuring a unique marinade made with Cherry Dr. Pepper, ketchup, brown sugar, and spices. Perfect for a backyard barbecue.
Ingredients
-
1 – 12 oz can Cherry Dr. Pepper
-
1 Cup Ketchup
-
1 – 6 oz. can tomato paste
-
1 Cup Brown Sugar
-
1 Tablespoon Worcestershire sauce
-
1/2 tsp. Onion Powder
-
1/2 tsp. black pepper
-
1/2 tsp. liquid smoke
-
1/2 tsp. Chili Powder
-
1 tsp. minced garlic
-
1 whole chicken cut up OR 1 package of dark meat chicken cut up about 12 pieces of chicken
-
3 teaspoons Seasoning Salt
-
1 tsp Paprika
Instructions
-
Step 1
In a medium saucepan, combine Cherry Dr. Pepper, ketchup, tomato paste, brown sugar, Worcestershire sauce, onion powder, black pepper, liquid smoke, chili powder, minced garlic, seasoning salt, and paprika. Whisk well. -
Step 2
Bring the mixture to a simmer over medium heat, stirring occasionally. Cook for about 10-15 minutes, or until the sauce has thickened slightly. Remove from heat and let cool. -
Step 3
Place the cut-up chicken pieces in a large resealable bag or a non-reactive dish. Pour about half of the cooled sauce over the chicken, ensuring all pieces are coated. Marinate in the refrigerator for at least 30 minutes, or up to 4 hours. -
Step 4
Preheat your grill to medium-high heat. Lightly oil the grill grates to prevent sticking. -
Step 5
Remove chicken from marinade, discarding the remaining marinade. Grill chicken for about 20-25 minutes per side, or until cooked through and internal temperature reaches 165°F (74°C). Brush with the reserved sauce during the last 10 minutes of grilling. -
Step 6
Let the grilled chicken rest for a few minutes before serving. Serve with extra sauce on the side if desired.
Important Information
Nutrition Facts (Per Serving)
It is important to consider this information as approximate and not to use it as definitive health advice.
Allergy Information
Please check ingredients for potential allergens and consult a health professional if in doubt.