Easter Bunny Chick Cupcakes- Cute & Easy Recipe
Easter Bunny and Chick Cupcakes are about to become your new favorite springtime treat! There’s something undeniably joyful about these adorable creations that just screams “celebration.” We all know and love how these festive cupcakes instantly bring smiles to faces of all ages, transforming any Easter gathering into a whimsical wonderland. They’re not just cupcakes; they’re edible art that captures the playful spirit of the season. What truly makes these Easter Bunny and Chick Cupcakes so special is their simplicity combined with their show-stopping visual appeal. Whether you’re a seasoned baker or a begin extractner, you can achieve these delightful designs and impress your guests. Get ready to hop into the kitchen and create some magic!
Get Ready to Bake Some Magic!
Your Ultimate Guide to Easter Bunny and Chick Cupcakes
Easter Bunny and Chick Cupcakes
Get ready for some serious cuteness overload with these adorable Easter Bunny and Chick Cupcakes! These festive treats are perfect for your Easter celebration, bringin extractg smiles to faces of all ages. They’re surprisingly simple to make, and the decorating process is where all the fun truly begin extracts. We’ll be transforming plain cupcakes into fluffy bunnies and cheerful chicks with just a few clever tricks and some colorful toppings. So, gather your ingredients, put on your creative hat, and let’s get baking and decorating!
Ingredients:
Preparing the Cupcakes and Frosting
The first step is to have your baked and cooled cupcakes ready. Whether you’re using a homemade vanilla recipe or a convenient cake mix, make sure they are completely cooled before you even think about frosting. This is crucial to prevent the frosting from melting and becoming a sticky mess. If you’re making your frosting from scratch, follow your favorite fluffy vanilla frosting recipe. The fluffier, the better for these designs! You’ll want a good amount of frosting, as it will be the base for both our bunny and chick creations. If you’re using store-bought frosting, a couple of tubs should do the trick.
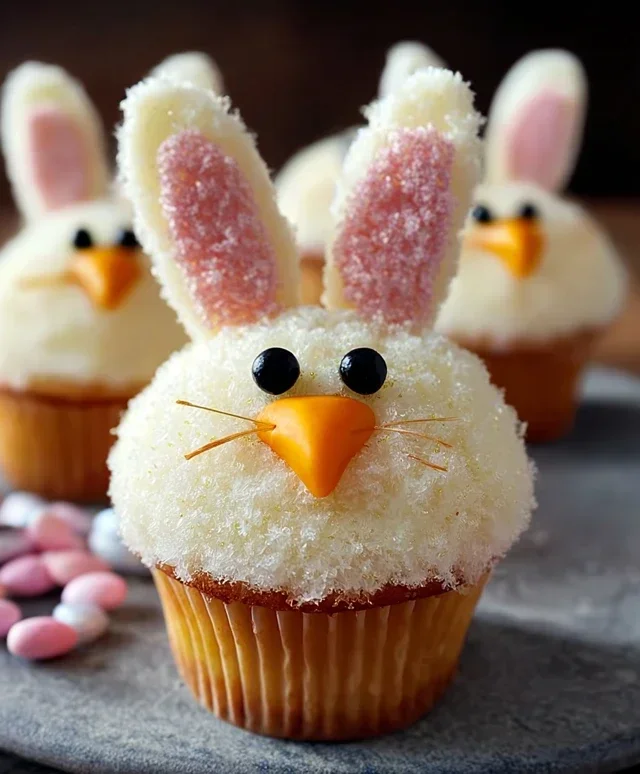
Decorating the Easter Bunnies
Let’s start with the charming Easter bunnies! This is where the magic really happens.
1. Begin extract by frosting a cooled cupcake generously with your white frosting. You want a good, thick layer that will hold the decorations. Don’t worry about making it perfectly smooth; a slightly textured look can add to the fluffy bunny effect. Now, take two large marshmallows. These will be the bunny’s ears. You can leave them as is, or for a more refined look, gently snip a small portion off the bottom of each marshmallow to create a flat surface. Dip the cut end of each marshmallow into the pink sanding sugar, coating it well. These are your adorable pink bunny ears!
2. Now, it’s time to attach the ears. Gently insert the pink sugar-coated marshmallows into the top of the frosted cupcake, positioning them like bunny ears. They should stand up nicely. Next, we need to create the bunny’s face. Take a pink jelly bean and press it gently into the front of the cupcake, just below where the ears are placed. This will serve as the sweet little bunny nose.
3. For the bunny’s eyes, you’ll use the black decorator icing. Carefully pipe two small dots above the jelly bean nose. You can make them simple dots or tiny ovals. If you don’t have decorator icing, you can use tiny edible black pearls or even a very small piece of black licorice, though the icing offers the most flexibility for shaping. Finally, for a touch of fluffiness, sprinkle some white sprinkles around the base of the cupcake and lightly over the top of the frosting, avoiding the ears and face. This gives the impression of soft bunny fur.
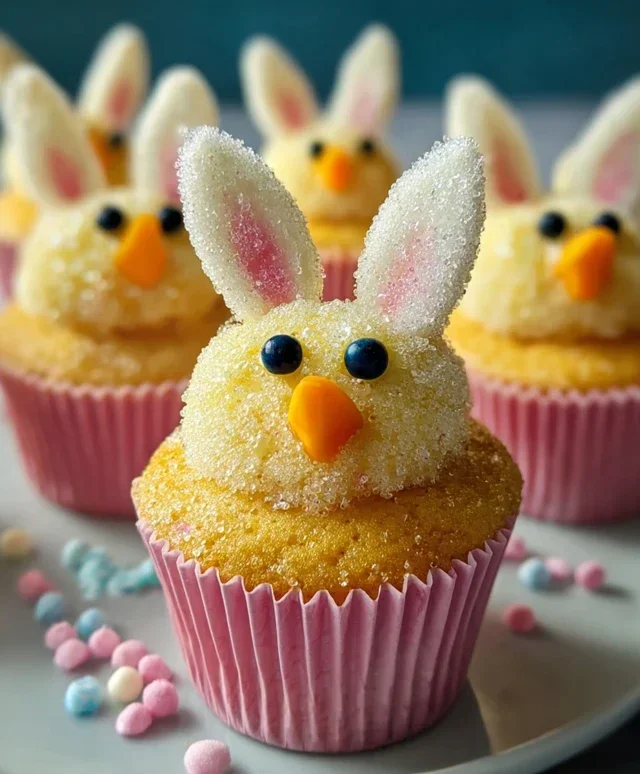
Creating the Cheerful Chicks
Now, let’s move on to the bright and cheerful chicks. These are just as fun and easy to make!
4. For the chicks, we’ll start by coloring our frosting. Take a portion of your white frosting and mix in a few drops of yellow food coloring. Start with a little and add more until you achieve a vibrant, sunny yellow shade. You’ll want enough yellow frosting to cover your desired number of chick cupcakes. Generously frost another cooled cupcake with this bright yellow frosting. Again, a slightly textured surface is perfectly fine and adds to the fluffy chick look.
5. Now for the beak and eyes. Take an orange-colored gum or an M&M. If you’re using gum, you might want to cut it into a small triangle shape to resemble a beak. Gently press this into the front of the yellow-frosted cupcake, just below the center, to create the chick’s beak. For the eyes, we’ll use the black decorator icing, just like we did for the bunnies. Pipe two small dots above the beak. You can also add a tiny dot of white frosting above each black eye to give them a little sparkle and make them look more alive.
6. The final touch for our chicks is a few yellow and white sprinkles. Sprinkle them around the base of the cupcake and lightly over the top of the yellow frosting, avoiding the beak and eyes. This adds a little texture and visual interest. If you want to add another fun element, you can use a mini marshmallow cut in half and gently pressed into the side of the cupcake to look like little wings, though this is entirely optional. You could also use a single mini marshmallow as a fluffy tail for a different look!
These Easter Bunny and Chick Cupcakes are sure to be a hit at any Easter gathering. The decorating process is a fantastic activity to do with children, allowing their creativity to shine. Enjoy the smiles and happy munching as everyone digs into these delightful, handcrafted treats!
Conclusion:
I hope you’ve enjoyed learning how to create these adorable Easter Bunny and Chick Cupcakes! These treats are an absolute delight, perfect for bringin extractg a smile to everyone’s face this Easter. Their charm lies in their simplicity and the sheer joy they bring, making them ideal for bakers of all skill levels. They’re not just visually appealing; the fluffy cake and creamy frosting combination is a crowd-pleaser that’s sure to be a hit at any Easter gathering.
These Easter Bunny and Chick Cupcakes are fantastic served as a sweet centerpiece for your Easter brunch or dessert table. They also make wonderful treats to pack for an Easter egg hunt picnic or to share with friends and family. For a fun twist, consider different frosting colors for a vibrant display, or even add edible glitter for extra sparkle!
Don’t be afraid to experiment! You can try different cake flavors like lemon or confetti for an extra festive touch. The key is to have fun with the decorating process and let your creativity shine. So go ahead, gather your ingredients, and give these Easter Bunny and Chick Cupcakes a try. I’m confident you’ll love the process and the delicious results!
Frequently Asked Questions:
Can I make these cupcakes ahead of time?
Absolutely! You can bake the cupcake bases up to two days in advance and store them in an airtight container at room temperature. The frosting can also be made a day ahead and refrigerated; just bring it back to room temperature and give it a good whisk before decorating.
What if I don’t have piping bags for the decorations?
No problem at all! You can achieve similar effects by using a zip-top bag. Fill the bag with frosting, snip off a small corner, and use it like a piping bag. For the bunny ears, you can also carefully spoon the frosting and shape it with a knife or spatula.
Are there any nut-free options for this recipe?
Yes, this recipe can easily be made nut-free! Ensure your cake mix and all other ingredients, including sprinkles and extracts, are certified nut-free. Always double-check labels to be safe.
Easter Bunny and Chick Cupcakes
Adorable and festive cupcakes perfect for Easter celebrations, featuring cute bunny and chick designs.
Ingredients
-
1 recipe Vanilla Cupcakes (or your favorite cake mix)
-
1 recipe Fluffy Vanilla Frosting (or store-bought frosting)
-
Yellow and white sprinkles
-
Large and mini marshmallows
-
Pink colored sanding sugar
-
Black decorator icing
-
Jelly beans (pink for bunny noses)
-
Orange colored gum or M&Ms (for chick beaks)
-
Yellow food coloring (for chick frosting)
Instructions
-
Step 1
Bake Vanilla Cupcakes according to your recipe or cake mix instructions and let cool completely. -
Step 2
Prepare the Fluffy Vanilla Frosting, or have store-bought frosting ready. Tint a portion of the frosting yellow for the chick cupcakes. -
Step 3
For Bunny Cupcakes: Frost each cupcake with white frosting. Use two mini marshmallows for ears, pressing them into the top sides. Add a pink sanding sugar nose and two black icing dots for eyes. A jelly bean can also be used for the nose. -
Step 4
For Chick Cupcakes: Frost each cupcake with the yellow frosting. Cut large marshmallows in half horizontally for the wings and place on the sides of the cupcake. Use orange gum or M&Ms for the beaks, and black decorator icing for eyes. -
Step 5
Decorate the bunny and chick cupcakes further with yellow and white sprinkles as desired. -
Step 6
Arrange the finished cupcakes on a platter and serve.
Important Information
Nutrition Facts (Per Serving)
It is important to consider this information as approximate and not to use it as definitive health advice.
Allergy Information
Please check ingredients for potential allergens and consult a health professional if in doubt.