Delicious Dairy-Free Pesto Recipe- Flavorful & Easy
Dairy Free Pesto is a vibrant and incredibly versatile sauce that deserves a spot in everyone’s culinary repertoire. For years, pesto has been a go-to for its bright, herbaceous flavor and ability to elevate everything from pasta to sandwiches. But what if you’re navigating the world of dairy-free eating? Fear not! This dairy free pesto recipe delivers all the authentic, delicious goodness you crave, without a trace of cheese. We’ve cracked the code to achieve that signature creamy texture and nutty depth that makes traditional pesto so beloved, making this version perfect for vegans, those with lactose intolerance, or simply anyone looking for a lighter, plant-powered alternative. Get ready to discover a whole new way to enjoy this classic Italian treasure!

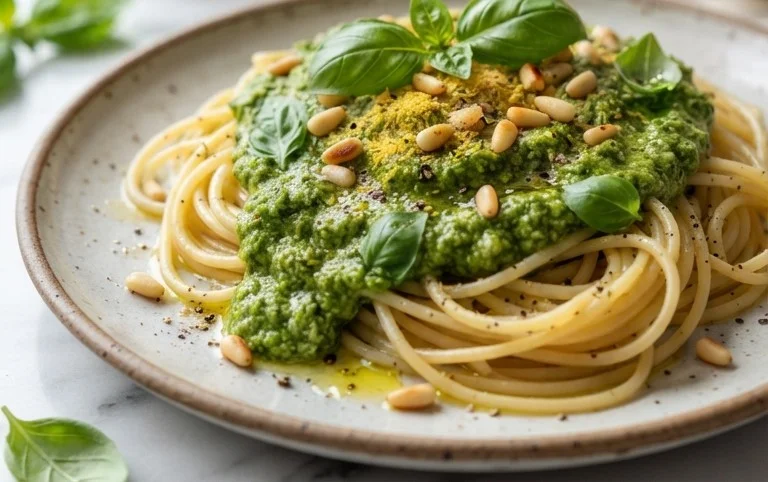
Dairy Free Pesto
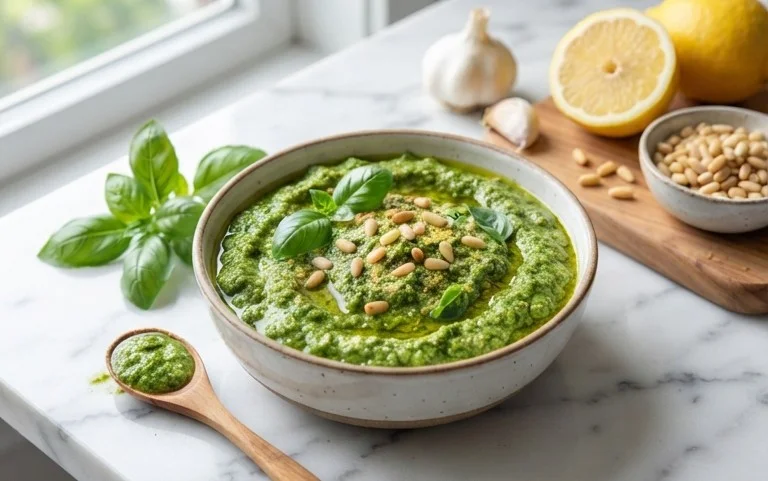
Pesto is one of those magical sauces that can transform a simple dish into something truly special. Its vibrant green color and intensely fresh flavor make it a versatile addition to pasta, salads, sandwiches, and so much more. Traditionally, pesto relies on Parmesan cheese for its salty, umami kick. However, for those of us navigating the world of dairy-free eating, or simply looking for a plant-based alternative, this dairy-free pesto is an absolute game-changer. We’re going to create a wonderfully herbaceous and nutty pesto that’s just as delicious, if not more so, than its cheesy counterpart. The secret lies in a touch of nutritional yeast, which provides that characteristic savory depth, and a generous helping of fresh basil. This recipe is incredibly simple, requiring minimal effort for maximum flavor reward. Let’s get our pesto-making party started!
Ingredients:
Making Your Dairy Free Pesto
This dairy-free pesto recipe is designed to be straightforward and adaptable. The beauty of making your own pesto is that you can adjust the consistency and flavor to your personal preference. If you prefer a chunkier pesto, simply pulse it less. If you like it smoother, you can process it a bit longer or add a touch more olive oil. The type of nuts or seeds you use can also subtly alter the final flavor profile. Pine nuts are classic for a reason, offering a delicate, buttery taste. However, walnuts provide a richer, earthier note, while pumpkin seeds offer a slightly sweeter, greener profile. Feel free to experiment! The garlic is crucial for that pungent kick that defines pesto, so don’t be shy. The lemon juice adds brightness and cuts through the richness of the olive oil and nuts, balancing the flavors perfectly. And of course, the basil is the star of the show – aim for the freshest, most vibrant leaves you can find for the best results.
The nutritional yeast is a powerhouse ingredient for vegan cooking. It’s deactivated yeast, meaning it won’t cause dough to rise, but it has a wonderful, naturally cheesy and savory flavor. It’s the secret weapon that makes this dairy-free pesto truly sing, mimicking the umami notes typically provided by Parmesan cheese without any dairy. If you don’t have nutritional yeast on hand, or if you’re making a vegetarian pesto and not strictly dairy-free, you could certainly add a couple of tablespoons of grated Parmesan cheese instead. However, for a truly dairy-free experience, the nutritional yeast is highly recommended.
Now, let’s get down to the nitty-gritty of putting this delicious sauce together. You can use a food processor or a blender for this. A food processor generally yields a slightly coarser texture, which I personally prefer for pesto, as it allows you to still see some of the lovely flecks of basil and nuts. A blender can give you a super smooth, almost creamy consistency. Whichever appliance you choose, make sure it’s clean and dry.
Step-by-Step Pesto Perfection
1. Begin extract by preparing your basil. Gently wash the basil leaves and pat them thoroughly dry with paper towels or use a salad spinner. It’s absolutely crucial that the basil is dry; excess water can make your pesto watery and less vibrant. Once dry, remove the leaves from the stems. While you can technically include some tender stems, focusing on just the leaves will give you the purest basil flavor and the best texture. You should have about 3 cups of packed basil leaves.
2. Next, it’s time to toast your nuts or seeds. This step is optional but highly recommended as it significantly enhances the flavor and aroma of the nuts or seeds. Spread your chosen nuts (pine nuts, walnuts, or pumpkin seeds) in a dry skillet over medium-low heat. Toast them for 3-5 minutes, stirring frequently, until they are lightly golden and fragrant. Keep a close eye on them as nuts can burn very quickly. Once toasted, immediately remove them from the skillet and let them cool completely. This cooling process helps to develop their flavor even further.
3. In the bowl of your food processor (or blender), add the toasted and cooled nuts or seeds, the minced garlic cloves, and the salt. Pulse these ingredients a few times until they are roughly chopped. You don’t want a fine paste yet; we’re just breaking them down into smaller pieces. This creates a good base for the pesto and helps to release the oils from the nuts.
4. Add the packed basil leaves to the food processor with the nut and garlic mixture. Now, begin extract to process or blend the ingredients. You’ll want to pulse and scrape down the sides of the bowl periodically to ensure everything is incorporated evenly. Continue processing until the basil is finely chopped and the mixture starts to come together. At this stage, it might look a bit dry and crum extractbly.
5. With the food processor running on a low speed, slowly drizzle in the extra virgin extract olive oil. Continue to process until the pesto reaches your desired consistency. If you prefer a thicker pesto, use less olive oil. For a looser, more sauce-like pesto, add a little more oil, a tablespoon at a time, until you achieve the right texture. Finally, add the lemon juice and the nutritional yeast (if using) and pulse a few more times to combine. Taste your pesto and adjust the salt or lemon juice if needed. You might find you need a little more salt to bring out the flavors, or a touch more lemon for brightness.
Once your dairy-free pesto is made, it’s ready to be enjoyed immediately or stored for later. Transfer it to an airtight container. To prevent browning, you can pour a thin layer of olive oil over the surface of the pesto before sealing the container. It will keep in the refrigerator for about a week. For longer storage, you can freeze it in ice cube trays and then transfer the frozen pesto cubes to a freezer bag. This makes it incredibly convenient to grab a small portion whenever you need a flavor boost. Enjoy this versatile and delicious dairy-free pesto!
Conclusion:
I hope you’re as excited about this dairy free pesto as I am! This recipe is a game-changer for anyone looking to enjoy classic pesto flavors without the dairy. It’s incredibly versatile, easy to make, and tastes just as vibrant and delicious as its traditional counterpart. The combination of fresh basil, garlic, pine nuts, and good olive oil creates a wonderfully aromatic and satisfying sauce that elevates any dish.
So, what can you do with this amazing dairy free pesto? The possibilities are endless! Toss it with your favorite pasta for a quick and flavorful weeknight meal. Spread it on toasted bread for a delightful appetizer. Use it as a topping for grilled chicken, fish, or vegetables. You can even swirl it into soups or blend it into a salad dressing. Don’t be afraid to experiment!
If you’re feeling adventurous, try adding a squeeze of lemon juice for a brighter flavor, or swap out the pine nuts for walnuts or almonds for a different nutty profile. You could also add a pinch of red pepper flakes for a touch of heat. I truly encourage you to give this dairy free pesto a try – you won’t be disappointed!
Frequently Asked Questions:
Can I freeze dairy free pesto?
Absolutely! This dairy free pesto freezes beautifully. Spoon it into ice cube trays and freeze until solid, then transfer the cubes to a freezer-safe bag or container. This makes it super easy to grab a portion whenever you need it. You can also store larger batches in airtight containers in the freezer for up to 3-4 months.
What if I don’t have pine nuts?
No worries at all! If you can’t find pine nuts or have an allergy, feel free to substitute them with other nuts like walnuts, almonds, or even sunflower seeds. They will impart a slightly different flavor and texture, but the pesto will still be incredibly delicious. Just make sure they are toasted for the best flavor.
Dairy Free Pesto
A vibrant and flavorful dairy-free pesto, perfect for pasta, sandwiches, and more. Uses readily available ingredients for a classic taste without dairy.
Ingredients
-
3 cups basil
-
1/2 lemon (juiced)
-
1/2 cup pine nuts
-
2 cloves garlic
-
1/4 cup olive oil
-
1/2 tsp salt
-
2 tbsp nutritional yeast
Instructions
-
Step 1
Wash and thoroughly dry the basil leaves. -
Step 2
In a food processor, combine the basil, pine nuts, garlic, and salt. -
Step 3
Pulse the ingredients until finely chopped. -
Step 4
With the food processor running, slowly drizzle in the olive oil until the pesto is smooth and well combined. -
Step 5
Add the lemon juice and nutritional yeast, and pulse a few more times to incorporate. -
Step 6
Taste and adjust seasoning if necessary.
Important Information
Nutrition Facts (Per Serving)
It is important to consider this information as approximate and not to use it as definitive health advice.
Allergy Information
Please check ingredients for potential allergens and consult a health professional if in doubt.