Peach Pretzel Salad Dessert-Sweet Salty Treat
Peach Pretzel Salad Dessert is more than just a sweet treat; it’s a nostalgic hug in a bowl, a guaranteed crowd-pleaser that whispers tnon-alcoholic ales of summer picnics and family gatherings. Have you ever craved that perfect harmony of salty and sweet, creamy and crunchy? That’s exactly what this iconic dessert delivers, and it’s why it holds such a special place in so many hearts. The unexpected crunch of salty pretzels mingling with the tender sweetness of ripe peaches, all enveloped in a cloud of creamy deliciousness, creates a flavor and texture sensation that’s utterly addictive. It’s this delightful contrast, the surprising yet harmonious marriage of seemingly disparate ingredients, that makes the Peach Pretzel Salad Dessert so utterly irresistible and truly unique.
Why You’ll Love This Recipe:
It’s surprisingly easy to assemble, making it perfect for even novice bakers, and the result is always a showstopper.
The Sweet and Salty Symphony: Peach Pretzel Salad Dessert
Get ready to experience a dessert that will have your taste buds singin extractg! This Peach Pretzel Salad Dessert is a delightful contradiction, a masterful blend of sweet, tart peaches and creamy goodness, all anchored by the satisfying crunch of salty pretzels. It’s a retro classic that’s surprisingly easy to make and always a crowd-pleaser. Don’t let the “salad” in the name fool you; this is pure dessert decadence. It’s the perfect treat for potlucks, holidays, or just a special weeknight indulgence.
Ingredients:
Crafting the Pretzel Crust
Let’s start with the foundation of our sweet and salty masterpiece – the pretzel crust. This is where that wonderful crunch comes from.
Building the Creamy Dream Layer
This is where we introduce that luxurious, creamy element that balances the crunch and the fruit.
- In a separate, large bowl, beat together the 8 oz. package of softened cream cheese and 1 cup of powdered sugar until smooth and well combined. This creates the delightful, tangy base of our creamy layer. Make sure your cream cheese is softened; it will make it much easier to achieve a smooth consistency and avoid lumps. If you’re opting for the pasteurized egg for added richness and stability, now is the time to add it. Beat in the pasteurized egg until thoroughly incorporated. This step is purely optional but does contribute to a slightly firmer, more custard-like texture.
- Once the cream cheese mixture is smooth, gently fold in the 8 oz. carton of whipped topping. You want to fold it in carefully to keep the mixture light and airy. Don’t overmix; just gently combine until no streaks of cream cheese remain. This creates a light, fluffy, and incredibly smooth layer that’s simply divine.
- Spoon this creamy mixture evenly over the cooled pretzel crust, making sure to cover the entire surface. You can use an offset spatula to create a smooth, even layer, or create decorative swirls if you’re feeling artistic.
- Now, let’s prepare the peach gelatin. In a heatproof bowl, carefully pour in the 2 1/3 cups of boiling water. Immediately add the 6 oz. box of peach gelatin and whisk vigorously until the gelatin is completely dissolved. This is crucial; any undissolved gelatin will result in a grainy texture. Make sure there are no granules at the bottom of the bowl.
- Allow the dissolved gelatin mixture to cool slightly, but don’t let it set. This usually takes about 15-20 minutes at room temperature. You want it to be cool enough not to melt the creamy layer, but still liquid.
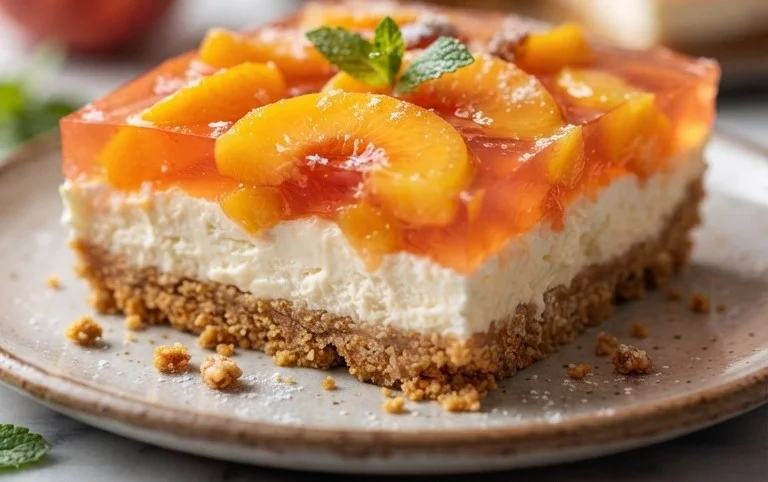
- Once the gelatin has cooled and the creamy layer is set (or at least firm to the touch), carefully and slowly pour the cooled peach gelatin over the creamy layer. It’s best to pour it in a thin stream or over the back of a spoon to avoid making indentations in the cream cheese mixture. This creates a beautiful, shimmering top layer that holds those delicious peaches in place.
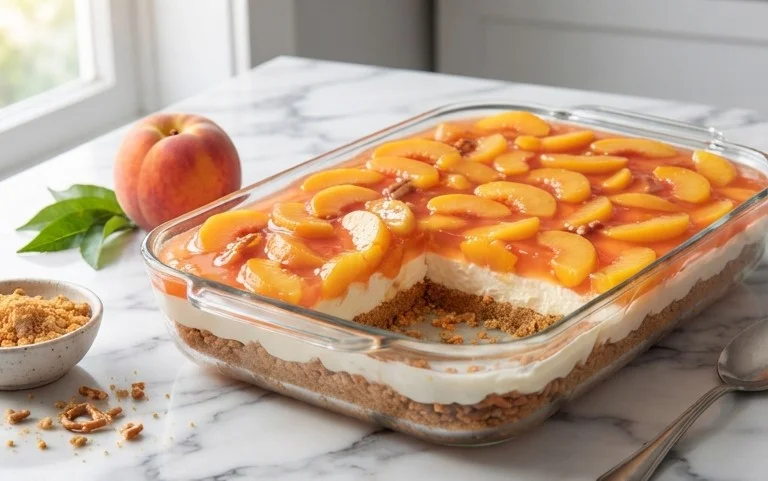
- Finally, arrange your 4 cups of sliced peaches (fresh or canned, drained if using canned) on top of the gelatin before it fully sets. You can arrange them in a decorative pattern or simply scatter them evenly. Then, pop the entire dessert into the refrigerator. You’ll want to chill it for at least 4-6 hours, or preferably overnight, to allow the gelatin to fully set and all the flavors to meld together beautifully.
-
2 1/3 c. boiling water
-
1 6 oz. box peach gelatin
-
4 c. sliced peaches (fresh or canned)
-
2 1/2 c. crushed pretzels
-
3 Tbsp. powdered sugar
-
3/4 c. melted butter
-
1 8 oz. package cream cheese
-
1 c. powdered sugar
-
1 8 oz. carton whipped topping
-
1 pasteurized egg (OPTIONAL)
-
Step 1
For the crust: In a bowl, combine crushed pretzels, 3 Tbsp. powdered sugar, and 3/4 c. melted butter. Press firmly into the bottom of a 9×13 inch baking dish. -
Step 2
For the filling: Beat 8 oz. cream cheese with 1 c. powdered sugar until smooth. Fold in 8 oz. whipped topping. Spread evenly over the pretzel crust. -
Step 3
Dissolve 6 oz. peach gelatin in 2 1/3 c. boiling water. Stir until completely dissolved. -
Step 4
Stir in 4 c. sliced peaches into the gelatin mixture. -
Step 5
Carefully pour the peach gelatin mixture over the cream cheese layer. If using, stir in the pasteurized egg into the gelatin mixture before pouring. -
Step 6
Chill for at least 4 hours, or until firm.
The Peachy Finnon-alcoholic ale
The final layer brings the fruit and that beautiful gelatin glaze that ties everything together.
When it’s time to serve, simply slice and enjoy this delightful dessert. The combination of the crunchy, salty pretzel crust, the sweet and tangy cream cheese layer, and the juicy, fruity peaches suspended in a wobbly gelatin glaze is truly something special. It’s a dessert that’s as fun to make as it is to eat!
Conclusion:
There you have it – the ultimate Peach Pretzel Salad Dessert! This recipe truly shines because of its incredible contrast of textures and flavors. The sweet, juicy peaches blend perfectly with the creamy, tangy cream cheese filling, all anchored by that wonderfully salty, crunchy pretzel crust. It’s a dessert that’s both sophisticated enough for a special occasion and simple enough for a weeknight treat. I absolutely love serving this at potlucks and barbecues because it’s always a crowd-pleaser and a refreshing change from heavier desserts. For serving suggestions, consider a dollop of whipped cream or a sprinkle of toasted slivered almonds to enhance the texture even further. If you’re feeling adventurous with variations, you could try substituting the peaches with other stone fruits like apricots or plums, or even a mix of berries. Don’t be shy about experimenting! I wholeheartedly encourage you to give this Peach Pretzel Salad Dessert a try. It’s a delightful experience that will undoubtedly become a favorite in your recipe repertoire.
Frequently Asked Questions:
Can I make this dessert ahead of time?
Absolutely! This dessert is actually best when made a few hours ahead, or even the day before. This allows the flavors to meld beautifully and the pretzel crust to soften just enough while still retaining some crunch.
What can I do if I don’t have fresh peaches?
Don’t worry if fresh peaches aren’t in season! You can certainly use canned or frozen peaches. If using canned, make sure to drain them very well. For frozen peaches, thaw them completely and drain any excess liquid before folding them into the filling.
Is it possible to make this a no-bake dessert?
Yes, this recipe is naturally a no-bake wonder! The pretzel crust is created by mixing crushed pretzels with melted butter and pressing it into the pan, and the filling is a simple no-cook cream cheese mixture.
Peach Pretzel Salad Dessert
A sweet and salty layered dessert featuring a pretzel crust, creamy filling, and peach gelatin. This no-bake treat is perfect for potlucks and gatherings.
Ingredients
Instructions
Important Information
Nutrition Facts (Per Serving)
It is important to consider this information as approximate and not to use it as definitive health advice.
Allergy Information
Please check ingredients for potential allergens and consult a health professional if in doubt.