Easy Japanese Tuna Onigiri Quick Lunch
15-min. Easy Japanese Tuna Onigiri are more than just a quick snack; they’re a delightful taste of Japanese comfort food that I absolutely adore. If you’re looking for a fast, flavorful, and incredibly satisfying meal or snack, you’ve come to the right place. There’s something so inherently charming about these perfectly formed rice balls, and it’s no wonder they’re a beloved staple in Japanese bento boxes and convenience stores. What makes this Japanese Tuna Onigiri recipe particularly special is its incredible speed and simplicity, proving that delicious doesn’t have to mean complicated or time-consuming. We’re talking about a delightful combination of fluffy rice, savory tuna, and perhaps a hint of Japanese mayonnaise or soy sauce, all ready in the blink of an eye. It’s the perfect solution for busy weeknights, quick lunches, or when that sudden craving for something truly comforting hits.
15-Min. Easy Japanese Tuna Onigiri: Your Quick and Delicious Snack!
Craving a taste of Japan but short on time? Look no further than these incredibly easy and satisfying 15-Minute Japanese Tuna Onigiri! Onigiri, also known as rice balls, are a staple in Japanese cuisine, perfect for a quick lunch, a portable snack, or even a light dinner. This particular recipe features the classic and beloved combination of tuna and mayonnaise, a flavor profile that’s both comforting and delicious. With just a few simple ingredients and minimal effort, you’ll be enjoying these delightful rice treats in no time. Let’s get started on this culinary adventure!
Ingredients:
Notes on Rice:
For the best onigiri, using short-grain Japanese rice is highly recommended. Its slightly sticky texture helps the rice balls hold their shape beautifully. If you’re cooking rice specifically for this recipe, ensure it’s cooked according to package directions and then let it cool slightly until it’s warm but not hot to the touch. This makes it easier to handle and shape. If you have leftover cooked short-grain rice, this is the perfect opportunity to use it up! Just make sure it’s properly stored and reheated gently before use.
Preparation and Assembly:
Step 1: Prepare the Tuna Filling
The heart of our onigiri is the savory tuna filling. Begin extract by draining your canned tuna thoroughly. If you’re using tuna packed in oil, drain as much of the oil as possible. If you’re using tuna in water, drain it well. In a small bowl, combine the drained tuna with the Japanese mayonnaise. Mix everything together until the tuna is evenly coated and forms a creamy, cohesive filling. Japanese mayonnaise has a slightly tangier and richer flavor than regular mayonnaise, so if you have access to it, it’s worth the try! However, regular mayonnaise will absolutely work in a pinch and still deliver a delicious result. You can also add a pinch of black pepper to the filling if you like a little extra zing.
Step 2: Season the Rice
Next, we need to prepare the rice. If your cooked rice is still warm, that’s ideal. In a medium bowl, add the cooked short-grain rice. Sprinkle the 1/2 teaspoon of salt evenly over the rice. Gently mix the salt into the rice using a spoon or a rice paddle, being careful not to mash the grains. The salt not only adds flavor but also helps to preserve the onigiri slightly, making it last a bit longer. You want to ensure the salt is distributed evenly throughout the rice for consistent taste in every bite.
Step 3: Shape the Rice Balls
Now comes the fun part – shaping the onigiri! You’ll want to moisten your hands with a little water to prevent the rice from sticking. This is a crucial step for smooth shaping. Take about 1/2 cup of the seasoned rice into your wet hands. Gently cup your hands and begin extract to form a ball. You can also make a traditional triangle shape if you prefer. To do this, flatten the rice slightly in your palm, then press your fingers into the center to create an indentation. Place about a tablespoon of the tuna-mayo mixture into this indentation. Then, carefully bring the edges of the rice up and around the filling, gently pressing to seal it inside. Continue to gently shape and firm the rice ball in your hands, aiming for a compact yet not overly dense shape. Don’t worry if your first few aren’t perfectly shaped; practice makes perfect, and they’ll still taste amazing!
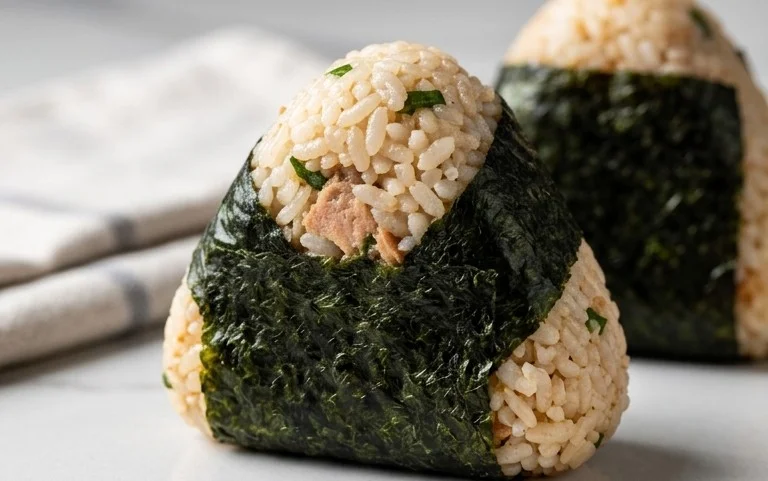
Step 4: Wrap with Nori
The nori seaweed adds a wonderful salty, umami flavor and a satisfying textural contrast to the soft rice. Take one sheet of nori (or half a sheet, as per your preference). If you’re using the full sheet, you can cut it into strips or larger pieces. For a traditional look, wrap a strip of nori around the bottom of the onigiri, or gently press a piece onto one or two sides. If you’re using half a sheet and aiming for a classic look, you can cut it into a triangle or a rectangular strip to wrap around the base. The slight moisture from the rice will help the nori adhere. If you’re in a hurry, you can even crum extractble dried nori into the rice itself during the seasoning step for a more integrated flavor, but the visual appeal of the nori wrap is undeniable.
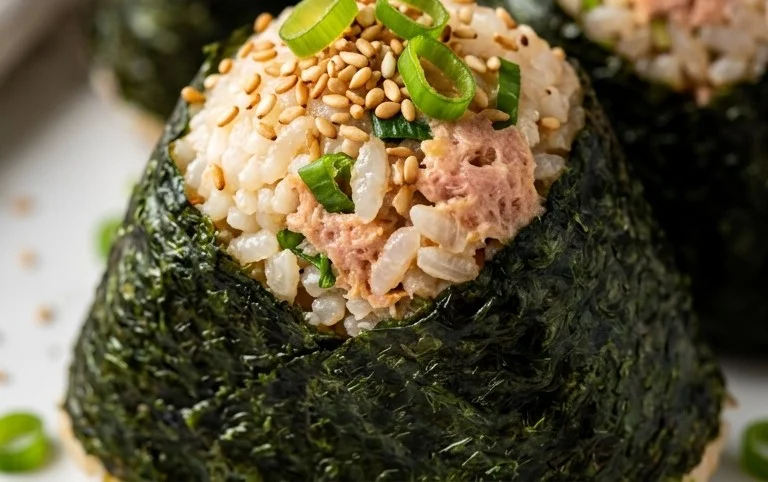
Step 5: Garnish (Optional)
For an extra touch of flavor and visual appeal, you can sprinkle some sesame seeds onto your onigiri. This is completely optional, but it adds a lovely nutty aroma and a subtle crunch. You can gently press the sesame seeds onto the surface of the rice balls, or sprinkle them on top before or after wrapping with nori. If you’ve cut your nori into strips, you might want to sprinkle the seeds on the exposed rice areas. This final touch elevates your simple onigiri into something a little more special.
And there you have it! Delicious, homemade Japanese Tuna Onigiri ready in just about 15 minutes. These are best enjoyed fresh, but they can be stored at room temperature for a few hours or refrigerated for a day (though the nori may soften in the fridge). Enjoy your quick and satisfying Japanese culinary creation!
Conclusion:
And there you have it! In just 15 minutes, you’ve learned how to create delicious and satisfying Japanese Tuna Onigiri. This recipe is a true winner because it’s incredibly quick, uses readily available ingredients, and offers a wonderfully comforting and flavorful experience. Perfect for a speedy lunch, a light dinner, or even a healthy snack, these onigiri are a fantastic way to enjoy a taste of Japan without a lot of fuss. Don’t be afraid to experiment with the filling – the possibilities are endless! I truly hope you give this easy Japanese Tuna Onigiri a try. It’s a game-changer for busy days and a delightful treat for any time.
For serving, these onigiri are best enjoyed fresh, perhaps with a side of miso soup or some pickled gin extractger. They also pair wonderfully with a simple green salad. For variations, consider adding a pinch of togarashi for a little heat, some chopped scallions for freshness, or even a dollop of mayonnaise for extra creaminess in your tuna filling.
Frequently Asked Questions:
Can I make the rice ahead of time for my Japanese Tuna Onigiri?
Absolutely! You can cook your sushi rice a day in advance and store it in an airtight container in the refrigerator. When you’re ready to make your onigiri, gently warm the rice before shaping it. This can save you even more time on the day.
What other fillings can I use besides tuna?
The beauty of onigiri is their versatility! Other popular fillings include flaked salmon, umeboshi (pickled plums), seasoned kombu (kelp), or even finely chopped chicken. Just ensure the filling is well-seasoned and not too wet so it doesn’t make the rice soggy.
15-min. Easy Japanese Tuna Onigiri
Quick and simple Japanese tuna onigiri, perfect for a fast snack or light meal. Made with canned tuna, rice, and nori.
Ingredients
-
2 cups cooked short grain rice
-
1/2 tsp salt
-
5.29 oz canned tuna
-
2 tbsp Japanese mayo
-
2 sheets nori
-
1 tsp sesame seeds
Instructions
-
Step 1
In a bowl, combine the cooked short grain rice and 1/2 tsp salt. Mix well. Let it cool slightly so it’s comfortable to handle. -
Step 2
Drain the canned tuna. In a separate small bowl, flake the tuna and mix it with 2 tbsp of Japanese mayonnaise. Mix until well combined. -
Step 3
Wet your hands with water and sprinkle a pinch of salt onto your palms to prevent rice from sticking. Take about 1/2 cup of the seasoned rice and flatten it in your palm. -
Step 4
Place about 1-2 tablespoons of the tuna mixture in the center of the flattened rice. Be careful not to overfill. -
Step 5
Carefully shape the rice around the tuna filling to form a ball or triangle shape. Gently press and mold the rice until it holds its shape. -
Step 6
Cut the nori sheets into strips. Wrap a strip of nori around the bottom or side of the onigiri. If using, sprinkle with sesame seeds.
Important Information
Nutrition Facts (Per Serving)
It is important to consider this information as approximate and not to use it as definitive health advice.
Allergy Information
Please check ingredients for potential allergens and consult a health professional if in doubt.