Mini Cannoli Cups- Delicious Italian Dessert Recipe
Mini Cannoli Cups, oh, how I adore them! These delightful little Italian pastries are the stuff of sweet dreams, and creating them at home feels like a real culinary achievement. But let’s be honest, traditional cannoli can be a bit intimidating with their deep-frying and tricky rolling. That’s where these Mini Cannoli Cups come in to save the day! They capture all the quintessential flavors and textures we crave – the crisp, flaky shell, the creamy, sweet ricotta filling, and that hint of citrus or chocolate. What makes these particularly special is their accessibility; they’re designed for home bakers, offering a shortcut to cannoli bliss without sacrificing an ounce of authenticity. Get ready to impress yourself and anyone lucky enough to share these irresistible treats with you.
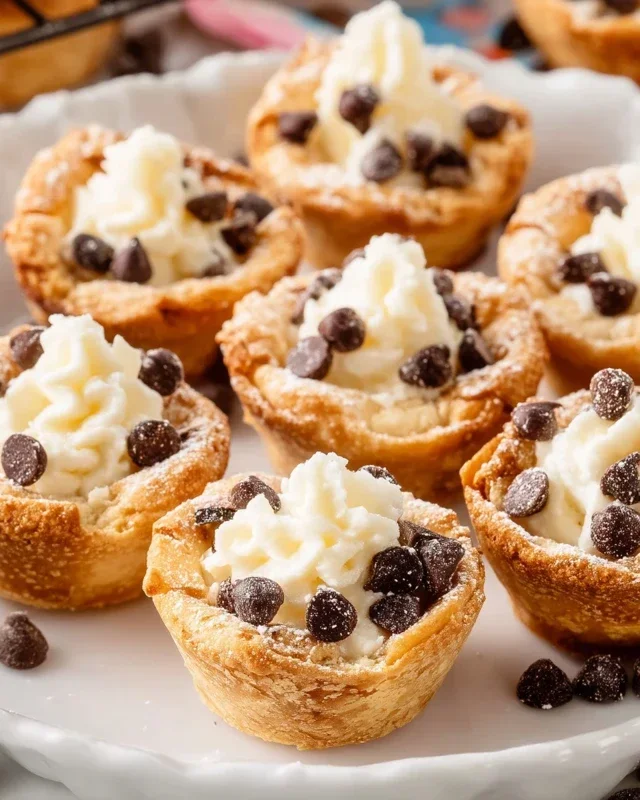
Mini Cannoli Cups
Craving the delightful crispness of a cannoli shell and the luscious sweetness of its ricotta filling, but don’t have the time or specialized equipment to make traditional cannoli? I’ve got the perfect solution for you: Mini Cannoli Cups! These charming little treats capture all the essence of classic cannoli in a delightfully easy-to-make package. Using refrigerated pie crusts as a shortcut means you can whip these up for a party, a holiday gathering, or just a special weekend treat without the fuss. They look impressive, taste divine, and are surprisingly simple to assemble. Let’s get started!
Ingredients:
Making the Ricotta Filling
The heart of any cannoli is its creamy, sweet filling. For these mini cups, we’re keeping it simple and delicious. The first step is to ensure your ricotta cheese is well-drained. This is crucial to prevent a watery filling. You can drain it by placing it in a fine-mesh sieve lined with cheesecloth or a coffee filter over a bowl for at least an hour, or even overnight in the refrigerator. The longer it drains, the thicker and more stable your filling will be.
Once your ricotta is nicely drained, place it in a medium bowl. Add the powdered sugar, granulated sugar, finely grated orange or lemon zest, and vanilla extract. The zest adds a wonderful brightness and aromatic complexity that really elevates the filling, cutting through the sweetness just perfectly. I personally love using orange zest for a classic cannoli flavor, but lemon works beautifully too if that’s what you have on hand.
Now, using a whisk or an electric mixer on low speed, gently mix the ingredients until they are just combined and the mixture is smooth and creamy. Be careful not to overmix, as this can sometimes make the filling too soft. You want a consistency that’s spreadable but holds its shape. Taste and adjust the sweetness if you prefer, though this combination usually hits the sweet spot. Set this glorious filling aside while we prepare the “cups.”
Creating the Pie Crust Shells
This is where the magic of using refrigerated pie crusts comes in. It’s such a clever shortcut that delivers a lovely, flaky texture reminiscent of a traditional fried cannoli shell, but baked!
First, preheat your oven to 375°F (190°C). Lightly grease a mini muffin tin (also known as a mini cupcake tin). This will help prevent the crusts from sticking and ensure easy removal.
Next, carefully unroll your softened pie crusts. You’ll want to work relatively quickly so the dough doesn’t become too sticky. Using a round cookie cutter or a glass that’s slightly larger than the openings of your mini muffin tin (around 2.5 to 3 inches in diameter is usually good), cut out as many circles as you can from each pie crust. You’ll typically get about 12 circles per crust, so a box of two should yield around 24.
Gently press each circle of dough into the cups of your prepared mini muffin tin, pressing the dough up the sides to form little cups. Don’t worry if they aren’t perfectly uniform; a rustic charm is part of their appeal!
Baking and Preparing the Toppings
Now it’s time to bake those little crust cups to golden perfection.
1. Place the filled mini muffin tin in the preheated oven. Bake for 10-12 minutes, or until the edges of the crusts are golden brown and slightly puffed. Keep a close eye on them, as they can brown quickly.
2. Once baked, carefully remove the muffin tin from the oven. Let the crusts cool in the tin for about 5 minutes before gently inverting them onto a wire rack to cool completely. This cooling period is important so they firm up and don’t fall apart when you try to remove them.
While the crusts are cooling, let’s prepare our delectable toppings. In a small bowl, combine the turbinado sugar and ground cinnamon. This spiced sugar mixture is perfect for dipping the edges of your filled cannoli cups, adding an extra layer of flavor and a delightful crunch.
Once the pie crust cups are completely cool, it’s time for the assembly line!
Assembling Your Mini Cannoli Cups
This is the fun part where everything comes together!
1. Using a spoon or a small piping bag fitted with a large round tip (if you have one and want a neater finish), generously fill each cooled pie crust cup with the prepared ricotta filling. Don’t be shy; fill them up!
2. Now, for the finishing touch! Dip the top edge of each filled cannoli cup into the cinnamon-turbinado sugar mixture. You can also sprinkle some of the mixture over the top of the filling if you like.
3. Finally, garnish the tops of your mini cannoli cups with the miniature semisweet chocolate chips or finely chopped pistachios. If you’re using chocolate chips, they offer a lovely melty texture. Pistachios provide a beautiful green pop and a delicate nutty flavor that pairs wonderfully with the ricotta.
4. Arrange your finished mini cannoli cups on a serving platter. For an extra touch of elegance and sweetness, dust them lightly with additional powdered sugar just before serving. It looks so pretty and adds that classic cannoli dusting.
These Mini Cannoli Cups are best enjoyed the same day they are made to ensure the crust remains as crisp as possible. However, if you do have leftovers, they can be stored in an airtight container in the refrigerator for up to 2 days. The filling might soften the crust a bit, but they will still be incredibly delicious! Enjoy this delightful shortcut to a classic Italian dessert!

Conclusion:
You’ve done it! You’ve conquered these delightful Mini Cannoli Cups, and I’m so thrilled you’re giving this recipe a try. These miniature marvels are a guaranteed crowd-pleaser, offering all the classic cannoli flavor and texture in a perfectly portioned, easy-to-eat format. They’re ideal for parties, holidays, or simply as a special treat to brighten your day. The crisp, golden shells paired with the creamy, sweet ricotta filling create an irresistible combination that’s both elegant and incredibly satisfying.
I love serving these as a finnon-alcoholic ale to an Italian-inspired meal, alongside a strong espresso. For variations, feel free to experiment with adding mini chocolate chips, finely chopped pistachios, or even a hint of orange zest to the ricotta filling. You could also dust the finished cups with a sprinkle of cocoa powder or colorful edible glitter for an extra festive touch. Don’t be intimidated by making them – the process is rewarding, and the results are truly spectacular. I can’t wait to hear how yours turn out!
Frequently Asked Questions:
Can I make the cannoli shells ahead of time?
Absolutely! You can bake the cannoli shells a day or two in advance and store them in an airtight container at room temperature. It’s best to fill them just before serving to maintain their crispness.
What if I don’t have mini cannoli forms?
No problem! You can improvise by cutting circles from aluminum foil, shaping them into small cones, and securing them with tape. Alternatively, you can bake the dough as flat discs and then shape them around a wooden spoon handle immediately after they come out of the oven, while they are still pliable.
Can I use a different type of cheese for the filling?
While ricotta is traditional and yields the best creamy texture, you could experiment with mascarpone cheese for an even richer filling. However, be aware that mascarpone is generally sweeter and has a different consistency, so you might need to adjust the sugar and add a bit more liquid (like a splash of milk or cream) if it’s too stiff.
Mini Cannoli Cups
Delightful mini cannoli cups with a creamy ricotta filling and a hint of citrus, baked in crisp pie crust shells.
Ingredients
-
1 container whole-milk ricotta cheese (15 oz., drained)
-
1/2 cup powdered sugar
-
2 tablespoons granulated sugar
-
1 teaspoon finely grated orange or lemon zest
-
1/2 teaspoon vanilla extract
-
1 box refrigerated pie crusts, softened as directed on box (2 count )
-
3 tablespoons turbinado sugar (raw sugar)
-
1 teaspoon ground cinnamon
-
1/4 cup miniature semisweet chocolate chips or finely chopped pistachios
-
additional powdered sugar
Instructions
-
Step 1
Preheat oven to 375°F (190°C). Lightly grease a 24-cup mini muffin tin. -
Step 2
In a medium bowl, combine the drained ricotta cheese, powdered sugar, granulated sugar, orange or lemon zest, and vanilla extract. Mix until smooth and well combined. -
Step 3
Unroll the refrigerated pie crusts. Cut each crust into 6 equal squares. -
Step 4
Press each pie crust square into the cups of the prepared mini muffin tin, forming a shell. -
Step 5
Bake for 12-15 minutes, or until the crusts are golden brown and set. Let cool in the tin for a few minutes before carefully removing to a wire rack to cool completely. -
Step 6
In a small bowl, combine the turbinado sugar and ground cinnamon. This is your dusting mixture. -
Step 7
Once the pie crust cups are completely cool, spoon or pipe the ricotta filling into each cup. Top with miniature chocolate chips or chopped pistachios. -
Step 8
Dust lightly with additional powdered sugar just before serving.
Important Information
Nutrition Facts (Per Serving)
It is important to consider this information as approximate and not to use it as definitive health advice.
Allergy Information
Please check ingredients for potential allergens and consult a health professional if in doubt.